前言
通过前面的学习, 我们知道如何使用 GLSurfaceView 配合自定义 Renderer 来绘制我们想要的图像和纹理, 但却没有深究它是怎么工作的
这里我们通过 EGL 的学习来理清这一流程
什么是 EGL?
OpenGL ES 是操作 GPU 的 API, 它无法直接与屏幕设备进行交互, EGL 是 OpenGL ES 渲染 API 和本地窗口系统(native platform window system)之间的一个中间接口层,它也主要由厂商来实现
- EGLDisplay
- 显示设备抽象描述
- EGLContext
- 描述 OpenGL ES 的上下文, 存储 OpenGL ES绘图的一些状态信息
- EGLSurface
- 描述存储图像的内存缓冲区域, 在 Android 端为 Surface/SurfaceTexture
EGL 在 GLSurfaceView 中的使用
我们之前定义的 Renderer 能够在 GLSurfaceView 上执行渲染操作, 是因为 GLSurfaceView 中初始化了 EGL 的环境, 我们看看它是如何实现的
public class GLSurfaceView extends SurfaceView implements SurfaceHolder.Callback2 {

    private GLThread mGLThread;
    private Renderer mRenderer;

    public void setRenderer(Renderer renderer) {
        ......
        mRenderer = renderer;
        // 创建 GL 线程
        mGLThread = newGLThread(mThisWeakRef);
        // 启动 GL 线程
        mGLThread.start();
    }

}
好的, 可以看到在 GLSurfaceView.setRenderer 的方法中, 创建并启动了 GLThread 线程, 接下来看看具体实现
public class GLSurfaceView extends SurfaceView implements SurfaceHolder.Callback2 {

    static class GLThread extends Thread {

        @Override
        public void run() {
            try {
                guardedRun();
            } catch (InterruptedException e) {
                ......
            } finally {
                ......
            }
        }

        private void guardedRun() throws InterruptedException {

            mEglHelper = new EglHelper(mGLSurfaceViewWeakRef);
            mHaveEglContext = false;
            mHaveEglSurface = false;
            mWantRenderNotification = false;

            try {
                GL10 gl = null;
                boolean createEglContext = false;
                boolean createEglSurface = false;
                boolean createGlInterface = false;
                boolean lostEglContext = false;
                boolean sizeChanged = false;
                while (true) {
                    synchronized (sGLThreadManager) {
                        while (true) {
                            if (mShouldExit) {
                                return;
                            }
                            ......
                            // Ready to draw?
                            if (readyToDraw()) {
                                // If we don't have an EGL context, try to acquire one.
                                if (! mHaveEglContext) {
                                    if (askedToReleaseEglContext) {
                                        askedToReleaseEglContext = false;
                                    } else {
                                        try {
                                            // 1. 初始化 GL 的环境
                                            mEglHelper.start();
                                        } catch (RuntimeException t) {
                                            ......
                                        }
                                        ......
                                    }
                                }
                                ......
                            } else {
                                ......
                            }
                        }
                    }
                    ......
                    if (createEglSurface) {
                        // 2. 创建 GLSurface 描述帧缓冲
                        if (mEglHelper.createSurface()) {
                            ......
                        } else {
                            ......
                            continue;
                        }
                        createEglSurface = false;
                    }
                    ......
                    // 3. 回调 Renderer 的生命周期
                    if (createEglContext) {
                        ......
                        GLSurfaceView view = mGLSurfaceViewWeakRef.get();
                        if (view != null) {
                            try {
                                // 3.1 回调 onSurfaceCreated
                                view.mRenderer.onSurfaceCreated(gl, mEglHelper.mEglConfig);
                            } finally {
                                ......
                            }
                        }
                        createEglContext = false;
                    }

                    if (sizeChanged) {
                        GLSurfaceView view = mGLSurfaceViewWeakRef.get();
                        if (view != null) {
                            try {
                                // 3.2 回调 onSurfaceChanged
                                view.mRenderer.onSurfaceChanged(gl, w, h);
                            } finally {
                                Trace.traceEnd(Trace.TRACE_TAG_VIEW);
                            }
                        }
                        sizeChanged = false;
                    }
                    ......
                    {
                        GLSurfaceView view = mGLSurfaceViewWeakRef.get();
                        if (view != null) {
                            try {
                                ......
                                // 3.3 执行 onDrawFrame
                                view.mRenderer.onDrawFrame(gl);
                                ......
                            } finally {
                                ......
                            }
                        }
                    }
                    // 4. 将 EGLSurface 中的数据推入 SurfaceFlinger
                    int swapError = mEglHelper.swap();
                    ......
                }

            } finally {
                ......
            }
        }

    }
}
好的, 可以看到 GLThread 的 run 方法中启动了 guardedRun 方法, 其内部维护了一个死循环, 具体的流程如下
- 调用 mEglHelper.start 初始化 GL 的环境
- 调用 mEglHelper.createSurface 创建缓冲帧 EGLSurface
- 回调 Renderer 的生命周期了
- 调用 mEglHelper.swap 将 EGLSurface 中的数据推入 SurfaceFlinger
可以看到, 之所以我们的 Renderer 能够生效, 是因为在 GLSurfaceView 的 GLThread 线程中已经初始化了 EGL 的环境
EGL 的操作封装在了 EGLHelper 这个对象内部, 接下来我们一一分析这几个步骤
一. 创建 EGL 环境
public class GLSurfaceView extends SurfaceView implements SurfaceHolder.Callback2 {

    private static class EglHelper {
        /**
         * Initialize EGL for a given configuration spec.
         * @param configSpec
         */
        public void start() {
            ......
            // 获取 EGL10 对象
            mEgl = (EGL10) EGLContext.getEGL();

            // 1. 创建 EGLDisplay 描述本地窗口的连接
            mEglDisplay = mEgl.eglGetDisplay(EGL10.EGL_DEFAULT_DISPLAY);
            ......

            // 1.2 初始化 EGLDisplay, 将版本号注入
            int[] version = new int[2];
            if(!mEgl.eglInitialize(mEglDisplay, version)) {
                throw new RuntimeException("eglInitialize failed");
            }

            GLSurfaceView view = mGLSurfaceViewWeakRef.get();
            if (view == null) {
                mEglConfig = null;
                mEglContext = null;
            } else {
                // 2. 创建 EGLConfig
                mEglConfig = view.mEGLConfigChooser.chooseConfig(mEgl, mEglDisplay);
                // 3. 创建 EGLContext
                mEglContext = view.mEGLContextFactory.createContext(mEgl, mEglDisplay, mEglConfig);
            }
            ......

            mEglSurface = null;
        }
    }

}
可以看到 EglHelper.start 中的流程是非常清晰, 主要有三个步骤
- 创建 EGLDisplay 用于描述硬件屏幕
- 初始化 EGL, 获取主次版本号信息
- 创建 EGLConfig
- 创建 EGLContext
一) 创建 EGLDisplay
// frameworks/native/opengl/include/EGL/egl.h
typedef void *EGLConfig;
typedef void *EGLSurface;
typedef void *EGLContext;

// frameworks/native/opengl/libagl/egl.cpp
EGLDisplay eglGetDisplay(NativeDisplayType display)
{
......
    if (display == EGL_DEFAULT_DISPLAY) {
        EGLDisplay dpy = (EGLDisplay)1;
        // 获取 EGLDisplay 对应的结构体 egl_display_t
        egl_display_t& d = egl_display_t::get_display(dpy);
        // 保存显示的类型
        d.type = display;
        // 返回 EGLDisplay
        return dpy;
    }
    return EGL_NO_DISPLAY;
}

const unsigned int NUM_DISPLAYS = 1;

struct egl_display_t
{

    NativeDisplayType  type;
    std::atomic_size_t initialized;
    // 构造
    egl_display_t() : type(0), initialized(0) { }

    // 创建结构体
    static egl_display_t& get_display(EGLDisplay dpy);

    static EGLBoolean is_valid(EGLDisplay dpy) {
        // DisplayType >= 1 说明 egl_display_t 有效
        return ((uintptr_t(dpy)-1U) >= NUM_DISPLAYS) ? EGL_FALSE : EGL_TRUE;
    }

};
好的, 可以看到 Native 层 EGLDisplay 是一个显示设备的标示符
- 当传入 EGL_DEFAULT_DISPLAY 时, 默认为 1
- EGLDisplay 对应了 egl_display_t 结构体
二) 创建 EGLConfig
public class GLSurfaceView extends SurfaceView implements SurfaceHolder.Callback2 {

    private EGLConfigChooser mEGLConfigChooser;

    public void setRenderer(Renderer renderer) {
        checkRenderThreadState();
        if (mEGLConfigChooser == null) {
            mEGLConfigChooser = new SimpleEGLConfigChooser(true);
        }
    }

    private class SimpleEGLConfigChooser extends ComponentSizeChooser {
        public SimpleEGLConfigChooser(boolean withDepthBuffer) {
            super(8, 8, 8, 0, withDepthBuffer ? 16 : 0, 0);
        }
    }

    /**
     * Choose a configuration with exactly the specified r,g,b,a sizes,
     * and at least the specified depth and stencil sizes.
     */
    private class ComponentSizeChooser extends BaseConfigChooser {
        public ComponentSizeChooser(int redSize, int greenSize, int blueSize,
                int alphaSize, int depthSize, int stencilSize) {
            super(
                // 1. 定义 EGLConfig 配置数组
                new int[] {
                    EGL10.EGL_RED_SIZE, redSize,
                    EGL10.EGL_GREEN_SIZE, greenSize,
                    EGL10.EGL_BLUE_SIZE, blueSize,
                    EGL10.EGL_ALPHA_SIZE, alphaSize,
                    EGL10.EGL_DEPTH_SIZE, depthSize,
                    EGL10.EGL_STENCIL_SIZE, stencilSize,
                    EGL10.EGL_NONE
                }
            );
            ......
       }
       ......
    }

    private abstract class BaseConfigChooser
            implements EGLConfigChooser {

        protected int[] mConfigSpec;

        public BaseConfigChooser(int[] configSpec) {
            // 2. 过滤配置属性
            mConfigSpec = filterConfigSpec(configSpec);
        }

        public EGLConfig chooseConfig(EGL10 egl, EGLDisplay display) {
            // 3. 通过 EGL10.eglChooseConfig 获取符合配置的 EGLConfig 个数
            int[] num_config = new int[1];
            if (!egl.eglChooseConfig(display, mConfigSpec, null, 0,
                    num_config)) {
                ......
            }
            int numConfigs = num_config[0];
            ......
            // 4. 通过 EGL10.eglChooseConfig 获取所有符合配置的 EGLConfig
            EGLConfig[] configs = new EGLConfig[numConfigs];
            if (!egl.eglChooseConfig(display, mConfigSpec, configs, numConfigs,
                    num_config)) {
                ......
            }
            // 5. 调用了抽象方法 chooseConfig, 一般选择 EGLConfig[] 第 0 个元素
            EGLConfig config = chooseConfig(egl, display, configs);
            if (config == null) {
                ......
            }
            return config;
        }

    }

}
可以看到这个 mEGLConfigChooser 的默认实现为 SimpleEGLConfigChooser 其具体的流程如下
- 定义 EGLConfig 配置数组
- 过滤配置数组
- 通过 EGL10.eglChooseConfig 获取符合配置的 EGLConfig 的个数
- 通过 EGL10.eglChooseConfig 获取所有符合配置的 EGLConfig
- 取所有符合配置的 EGLConfig 的首元素
有了 EGLConfig 之后便可以创建了 EGLContext 了
三) EGLContext 的创建
从上面的分析中可知, 创建 EGLContext 的动作由 mEGLContextFactory.createContext(…) 完成
public class GLSurfaceView extends SurfaceView implements SurfaceHolder.Callback2 {

    private class DefaultContextFactory implements EGLContextFactory {
        private int EGL_CONTEXT_CLIENT_VERSION = 0x3098;

        public EGLContext createContext(EGL10 egl, EGLDisplay display, EGLConfig config) {
            int[] attrib_list = {EGL_CONTEXT_CLIENT_VERSION, mEGLContextClientVersion,
                    EGL10.EGL_NONE };
            // 调用了 eglCreateContext 方法
            return egl.eglCreateContext(display, config, EGL10.EGL_NO_CONTEXT,
                    mEGLContextClientVersion != 0 ? attrib_list : null);
        }
    }
}
下面看看 native 的实现
EGLContext eglCreateContext(EGLDisplay dpy, EGLConfig config,
                            EGLContext /*share_list*/, const EGLint* /*attrib_list*/)
{
    // 验证 EGLDisplay 是否有效
    if (egl_display_t::is_valid(dpy) == EGL_FALSE)
        return setError(EGL_BAD_DISPLAY, EGL_NO_SURFACE);

    // 创建 Native 层的 EGLContext
    ogles_context_t* gl = ogles_init(sizeof(egl_context_t));
    ......

    // 创建 egl_context_t 真正描述 egl 的上下文
    egl_context_t* c = static_cast<egl_context_t*>(gl->rasterizer.base);
    c->flags = egl_context_t::NEVER_CURRENT;
    c->dpy = dpy;
    c->config = config;
    c->read = 0;
    c->draw = 0;

    // 强转成 EGLContext
    return (EGLContext)gl;
}
好的, 可以看到创建 EGLContext 的过程与创建 EGLDisplay 一致, 它对应的结构体实现为 egl_context_t
至此当前线程的 EGL 的环境便搭建好了, 我们知道 OpenGL 绘制之后是需要输出的, 这个输出的缓冲区即为 EGLSurface, 接下来看看缓冲区的相关操作
二. 创建数据缓冲区
public class GLSurfaceView extends SurfaceView implements SurfaceHolder.Callback2 {

    private static class EglHelper {

        public boolean createSurface() {
            ......
            /*
             * Create an EGL surface we can render into.
             */
            GLSurfaceView view = mGLSurfaceViewWeakRef.get();
            if (view != null) {
                // 1. 调用  mEGLWindowSurfaceFactory.createWindowSurface 创建 EGLSurface
                mEglSurface = view.mEGLWindowSurfaceFactory.createWindowSurface(mEgl,
                        mEglDisplay, mEglConfig, view.getHolder());
            } else {
                mEglSurface = null;
            }

            // 2. 将当前线程的 EGL 上下文设置为当前的 mEglContext
            if (!mEgl.eglMakeCurrent(mEglDisplay, mEglSurface, mEglSurface, mEglContext)) {
                ......
                return false;
            }

            return true;
        }
    }
}
可以看到 EglHelper.createSurface 中主要有两步操作
- 创建 EGLSurface
- 调用 EGL10.eglMakeCurrent 切换上下文
- 上下文切换成功之后, 当前线程便可以在该上下文下执行 OpenGL ES 的 API 了
我们先看看 EGLSurface 的创建
一) EGLSurface 的创建
public class GLSurfaceView extends SurfaceView implements SurfaceHolder.Callback2 {

    public void setRenderer(Renderer renderer) {
        checkRenderThreadState();
        ......
        if (mEGLWindowSurfaceFactory == null) {
            mEGLWindowSurfaceFactory = new DefaultWindowSurfaceFactory();
        }
       ......
    }

    private static class DefaultWindowSurfaceFactory implements EGLWindowSurfaceFactory {

        public EGLSurface createWindowSurface(EGL10 egl, EGLDisplay display,
                EGLConfig config, Object nativeWindow) {
            EGLSurface result = null;
            try {
                // 调用了 EGL10.eglCreateWindowSurface 创建了 EGLSurface
                result = egl.eglCreateWindowSurface(display, config, nativeWindow, null);
            } catch (IllegalArgumentException e) {
                ......
            }
            return result;
        }

    }

}
可以看到这里调用了一个 EGL10.eglCreateWindowSurface 创建了一个 EGLSurface 对象, 接下来看看 native 的实现
EGLSurface eglCreateWindowSurface(  EGLDisplay dpy, EGLConfig config,
                                    NativeWindowType window,
                                    const EGLint *attrib_list)
{
    return createWindowSurface(dpy, config, window, attrib_list);
}

static EGLSurface createWindowSurface(EGLDisplay dpy, EGLConfig config,
        NativeWindowType window, const EGLint* /*attrib_list*/)
{
    // 验证 EGLDisplay 是否有效
    if (egl_display_t::is_valid(dpy) == EGL_FALSE)
        return setError(EGL_BAD_DISPLAY, EGL_NO_SURFACE);
    ......
    // 创建 egl_surface_t
    egl_surface_t* surface;
    surface = new egl_window_surface_v2_t(dpy, config, depthFormat,
            static_cast<ANativeWindow*>(window));
    ......
    return surface;
}

struct egl_surface_t
{
    enum {
        PAGE_FLIP = 0x00000001,
        MAGIC     = 0x31415265
    };

    uint32_t            magic;
    EGLDisplay          dpy;
    EGLConfig           config;
    EGLContext          ctx;
    ......
}

struct egl_window_surface_v2_t : public egl_surface_t
{
    egl_window_surface_v2_t(
            EGLDisplay dpy, EGLConfig config,
            int32_t depthFormat,
            ANativeWindow* window);

private:
    ANativeWindow*   nativeWindow;
    ANativeWindowBuffer*   buffer;
    ANativeWindowBuffer*   previousBuffer;
    int width;
    int height;
    void* bits;
    GGLFormat const* pixelFormatTable;
    ......
}

egl_window_surface_v2_t::egl_window_surface_v2_t(EGLDisplay dpy,
        EGLConfig config,
        int32_t depthFormat,
        ANativeWindow* window)
    : egl_surface_t(dpy, config, depthFormat),
    nativeWindow(window), buffer(0), previousBuffer(0), bits(NULL)
{
    ......
}
好的, 我们看到 Native 层创建了一个 egl_surface_t 对象, 它的实现结构体为 egl_window_surface_v2_t, 它与 Surface/SurfaceTexture 对应
至此我们创建了一个用于保存 OpenGL 渲染管线输出数据的缓冲区, 接下来需要将其绑定到当前线程的 EGLContext, 才能正常工作, 我们看看 eglMakeCurrent 函数的实现
二) EGLSurface 绑定 EGLContext
EGLBoolean eglMakeCurrent(  EGLDisplay dpy, EGLSurface draw,
                            EGLSurface read, EGLContext ctx)
{
    ......// 验证异常信息

    // 获取当前线程上下文
    GLContext current_ctx = EGL_NO_CONTEXT;
     if (ctx == EGL_NO_CONTEXT) {
        // if we're detaching, we need the current context
        current_ctx = (EGLContext)getGlThreadSpecific();
    }

    // 将传入的上下文置为当前线程的上下文
    ogles_context_t* gl = (ogles_context_t*)ctx;
    if (makeCurrent(gl) == 0) {
        if (ctx) {
            ......// 处理 EGLSurface 与新的上下文绑定
        } else {
            ......// 处理 EGLSurface 与上下文的解绑
        }
        return EGL_TRUE;
    }
    return setError(EGL_BAD_ACCESS, EGL_FALSE);
}


static int makeCurrent(ogles_context_t* gl)
{
    // 之前的上下文
    ogles_context_t* current = (ogles_context_t*)getGlThreadSpecific();
    if (gl) {
        // 传入的上下文
        egl_context_t* c = egl_context_t::context(gl);

        // 若传入的上下文已经标记为当前上下文
        if (c->flags & egl_context_t::IS_CURRENT) {
            // 当前上下文与之不等, 这说明我们传入的 c 绑定的是其他线程的上下文
            if (current != gl) {
                return -1;
            }
        } else {
            // 解除当前线程绑定的上下文
            if (current) {
                // mark the current context as not current, and flush
                glFlush();
                egl_context_t::context(current)->flags &= ~egl_context_t::IS_CURRENT;
            }
        }
        // 将传入的 c 置为当前线程的上下文
        if (!(c->flags & egl_context_t::IS_CURRENT)) {
            setGlThreadSpecific(gl);
            c->flags |= egl_context_t::IS_CURRENT;
        }
    } else {
        // 若 gl 为 null, 则意为取消当前线程上下文的绑定
        if (current) {
            glFlush();
            egl_context_t::context(current)->flags &= ~egl_context_t::IS_CURRENT;
        }
        // this thread has no context attached to it
        setGlThreadSpecific(0);
    }
    return 0;
}
好的, 可以看到 makeCurrent 切换 OpenGL 渲染线程的上下文操作还是比较复杂的
- 传入 EGLContext 为无效, 则表示清空当前线程的上下文
- EGLSurface 会与之解绑
- 传入的 EGLContext 有效, 则将其置为当前线程的上下文
- 若 EGLContext 已绑定为其他线程的上下文, 会爆出异常
- 更新 EGLSurface 绑定的上下文
现在 EGLSurface 与 EGLContext 已经绑定好了, 现在就可以安心的执行 OpenGL 的渲染管线了, 也就是我们业务代码的编写
业务代码编写完成之后, 需要将数据推送到 SurfaceFlinger, 这就需要调用 eglSwapBuffers 来推送数据
三. 通知数据更新
public class GLSurfaceView extends SurfaceView implements SurfaceHolder.Callback2 {

    private static class EglHelper {

        public int swap() {
            // 调用了 EGL10.eglSwapBuffers, 将 mEglSurface 中的数据推送给到 SurfaceFlinger
            if (!mEgl.eglSwapBuffers(mEglDisplay, mEglSurface)) {
                return mEgl.eglGetError();
            }
            return EGL10.EGL_SUCCESS;
        }
    }

}
置换数据的操作很简单, 调用了 EGL10.eglSwapBuffers, 我们看看它的实现
EGLBoolean eglSwapBuffers(EGLDisplay dpy, EGLSurface draw)
{
    // 验证 Display 是否有效
    if (egl_display_t::is_valid(dpy) == EGL_FALSE)
        return setError(EGL_BAD_DISPLAY, EGL_FALSE);

    // 获取 EGLSurface 对应的结构体 egl_surface_t
    egl_surface_t* d = static_cast<egl_surface_t*>(draw);
    ......
    // 调用 egl_surface_t 的 swapBuffers
    d->swapBuffers();
    ......
    return EGL_TRUE;
}
可以看到, 这里调用了 egl_surface_t 的 swapBuffers 函数, 在 EGLSurface 创建的时候, 我们知道它的实现类为 egl_window_surface_v2_t, 因此我们看看 egl_window_surface_v2_t 的 swapBuffers 的实现
EGLBoolean egl_window_surface_v2_t::swapBuffers()
{
    // 上面执行了渲染管线, 因此这里的 buffer 非 0
    if (!buffer) {
        return setError(EGL_BAD_ACCESS, EGL_FALSE);
    }

    // 1. 从上一次重绘区域上拷贝数据
    if (!dirtyRegion.isEmpty()) {
        dirtyRegion.andSelf(Rect(buffer->width, buffer->height));
        if (previousBuffer) {
            // 判断是否需要从上一次重绘区域上取数据
            Region copyBack(Region::subtract(oldDirtyRegion, dirtyRegion));
            if (!copyBack.isEmpty()) {
                // 从上一帧的缓冲区取数据, 覆盖到 buffer 中
                void* prevBits;
                if (lock(previousBuffer,
                        GRALLOC_USAGE_SW_READ_OFTEN, &prevBits) == NO_ERROR) {
                    // copy from previousBuffer to buffer
                    copyBlt(buffer, bits, previousBuffer, prevBits, copyBack);
                    unlock(previousBuffer);
                }
            }
        }
        // 更新被重绘的区域
        oldDirtyRegion = dirtyRegion;
    }

    if (previousBuffer) {
        previousBuffer->common.decRef(&previousBuffer->common);
        previousBuffer = 0;
    }
    // 走到这里, 说明对 buffer 的操作已经完成了, 释放锁定
    unlock(buffer);
    // 将其置为上一帧数据
    previousBuffer = buffer;

    // 2. 使用 nativeWindow 将这个缓冲区到 SurfaceFlinger 待绘制队列
    nativeWindow->queueBuffer(nativeWindow, buffer, -1);
    buffer = 0;

    // 3. 获取一个新的缓冲区, 保存到 buffer 中
    int fenceFd = -1;
    if (nativeWindow->dequeueBuffer(nativeWindow, &buffer, &fenceFd) == NO_ERROR) {
        // 获取用存储栅格化数据共享内存的内存文件描述符
        sp<Fence> fence(new Fence(fenceFd));
        // 等待缓冲区内存分配完毕
        if (fence->wait(Fence::TIMEOUT_NEVER) != NO_ERROR) {
            nativeWindow->cancelBuffer(nativeWindow, buffer, fenceFd);
           return setError(EGL_BAD_ALLOC, EGL_FALSE);
        }
        ......
        // reallocate the depth-buffer if needed
        if ((width != buffer->width) || (height != buffer->height)) {
            // TODO: we probably should reset the swap rect here
            // if the window size has changed
            width = buffer->width;
            height = buffer->height;
            if (depth.data) {
                free(depth.data);
                depth.width   = width;
                depth.height  = height;
                depth.stride  = buffer->stride;
                uint64_t allocSize = static_cast<uint64_t>(depth.stride) *
                        static_cast<uint64_t>(depth.height) * 2;
                if (depth.stride < 0 || depth.height > INT_MAX ||
                        allocSize > UINT32_MAX) {
                    setError(EGL_BAD_ALLOC, EGL_FALSE);
                    return EGL_FALSE;
                }
                depth.data    = (GGLubyte*)malloc(allocSize);
                if (depth.data == 0) {
                    setError(EGL_BAD_ALLOC, EGL_FALSE);
                    return EGL_FALSE;
                }
            }
        }
        ......
    } else {
        return setError(EGL_BAD_CURRENT_SURFACE, EGL_FALSE);
    }

    return EGL_TRUE;
}
可以看到这里的 swapBuffers 的主要任务, 即将绘制到 Buffer 中的数据, 推送到 SurfaceFlinger 的渲染队列, 其主要步骤如下
- 从上一次重绘区域上拷贝数据
- 使用 nativeWindow(Surface/SurfaceTexture) 将这个缓冲区到 SurfaceFlinger 进程的 Layer 队列中
- 获取一个新的缓冲区, 保存到 buffer 中
四. EGL 的销毁
前面介绍了 GLSurfaceView 渲染线程 EGL 环境的创建相关的流程, 相对的, 当线程执行完毕, 我们还需要及时的释放 EGL 占用的资源
GLSurfaceView 中对于释放资源的代码比较分散, 这里就不以 GLSurfaceView 举例了, 它们的操作如下
public void release() {
    if (mEGLDisplay != EGL10.EGL_NO_DISPLAY) {
        EGL.eglMakeCurrent(mEGLDisplay, EGL10.EGL_NO_SURFACE, EGL10.EGL_NO_SURFACE,
                EGL10.EGL_NO_CONTEXT);
        EGL.eglDestroyContext(mEGLDisplay, mEGLContext);
        EGL.eglDestroySurface(mEGLDisplay, mEGLSurface);
        EGL.eglTerminate(mEGLDisplay);
    }
    mEGLContext = EGL10.EGL_NO_CONTEXT;
    mEGLDisplay = EGL10.EGL_NO_DISPLAY;
    mEGLSurface = EGL10.EGL_NO_SURFACE;
    mEGLConfig = null;
}
释放的操作比较简单, 这里就不再进入 native 查看了
总结
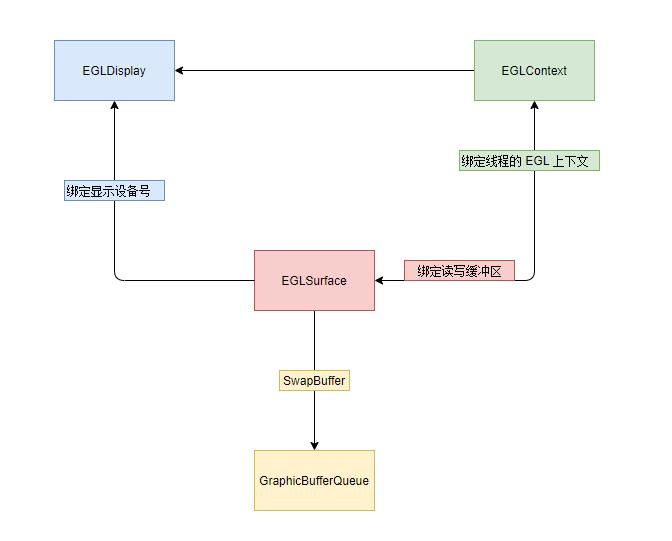
通过对 GLSurfaceView 中 EGL 分析, 我们得知 EGL 的使用流程如下所示
- 初始化环境
- 创建屏幕的描述 EGLDisplay(egl_display_t)
- 初始化 EGL 方法, 获取 EGL 版本号相关信息
- 创建 EGL 配置信息 EGLConfig(egl_config_t)
- 创建 EGL 上下文 EGLContext(egl_context_t)
- 创建缓冲帧 EGLSurface(egl_surface_t)
- 在线程中使用 EGL
- 通过 eglMakeCurrent 为当前线程绑定 EGLContext
- /////////////////////////////////////////
- 执行 OpenGL ES 的渲染管线
- /////////////////////////////////////////
- 交换缓冲, 将 EGLSurface 中的数据推送到 SurfaceFlinger 进程对应的 Layer 对象的队列中
- 推送之后, 会立即获取一个新的缓冲
- 绘制结束后销毁当前线程的 EGL 数据
掌握了这个流程, 我们可以封装一套 EGL 通用的代码(Google 示例), 便于在更多的场景下创建 EGL, 使用 OpenGL ES 的 API
- 感兴趣的同学可以仿照 GLSurfaceView 实现一个 GLTextureView