前言
Binder 驱动是基于 CS 模型设计的跨进程通信驱动, 想要使用 Binder 驱动进行通信, 需要三个步骤
- 定义交互规范
- 服务端实现
- 客户端实现
一. 定义交互规范
/**
 * 定义一个服务的提供的功能接口
 *
 * @author Sharry <a href="SharryChooCHN@Gmail.com">Contact me.</a>
 * @version 1.0
 * @since 2018/9/29 16:29
 */
public interface IService extends IInterface {

    /*
      跨进程提供服务的接口描述
     */
    String DESCRIPTOR = IService.class.getName();
    /*
      跨进程提供服务的接口中 getServiceName 这个方法 Transaction id.
     */
    int TRANSACTION_getServiceName = (IBinder.FIRST_CALL_TRANSACTION + 0);

    String getServiceName() throws RemoteException;

}
好的, 有了这个交互规范之后, 服务端和客户端分别实现这个接口, 就可以通过 Binder 驱动进行数据互通了
二. 服务端实现
/**
 * 接口 IService 在服务端的实现类
 * {@link #mBinder } 这个对象是让 IService 拥有跨进程提供数据能力的 Binder 本地实现类
 *
 * @author Sharry <a href="SharryChooCHN@Gmail.com">Contact me.</a>
 * @version 1.0
 * @since 2018/9/29 17:48
 */
public class ServiceImpl implements IService {

    private IBinder mBinder;

    public ServiceImpl(IBinder binder) {
        this.mBinder = binder;
    }

    @Override
    public String getServiceName() {
        return "This this IService support function.";
    }

    @Override
    public IBinder asBinder() {
        return mBinder;
    }

}

/**
 * Service 端 Binder 本地实现类
 * 其向外提供的功能接口为 {@link IService}
 *
 * @author Sharry <a href="SharryChooCHN@Gmail.com">Contact me.</a>
 * @version 1.0
 * @since 2018/9/28 20:50
 */
public class ServiceBinder extends Binder {

    /*
      持有其对应接口实现类的引用
     */
    private IService mImpl;

    public ServiceBinder() {
        mImpl = new ServiceBinder(this);
        // 调用了 attachInterface 之后, 父类 Binder 将会持有当前 IInterface 接口的描述
        // 在 onTransact 中 会自动处理 INTERFACE_TRANSACTION 类型的事务
        // 在 queryLocalInterface 中可以找到本地接口
        this.attachInterface(mImpl, mImpl.DESCRIPTOR);
    }

    @Override
    protected boolean onTransact(int code, Parcel data, Parcel reply, int flags) throws RemoteException {
        switch (code) {
            // 调用了 attachInterface 之后, 父类会处理该类型的 code.
//            case INTERFACE_TRANSACTION: {
//                reply.writeString(DESCRIPTOR);
//                return true;
//            }
            case IService.TRANSACTION_getServiceName: {
                data.enforceInterface(mImpl.DESCRIPTOR);
                reply.writeNoException();
                reply.writeString(mImpl.getServiceName());
                return true;
            }
            default:
                return super.onTransact(code, data, reply, flags);
        }
    }

}
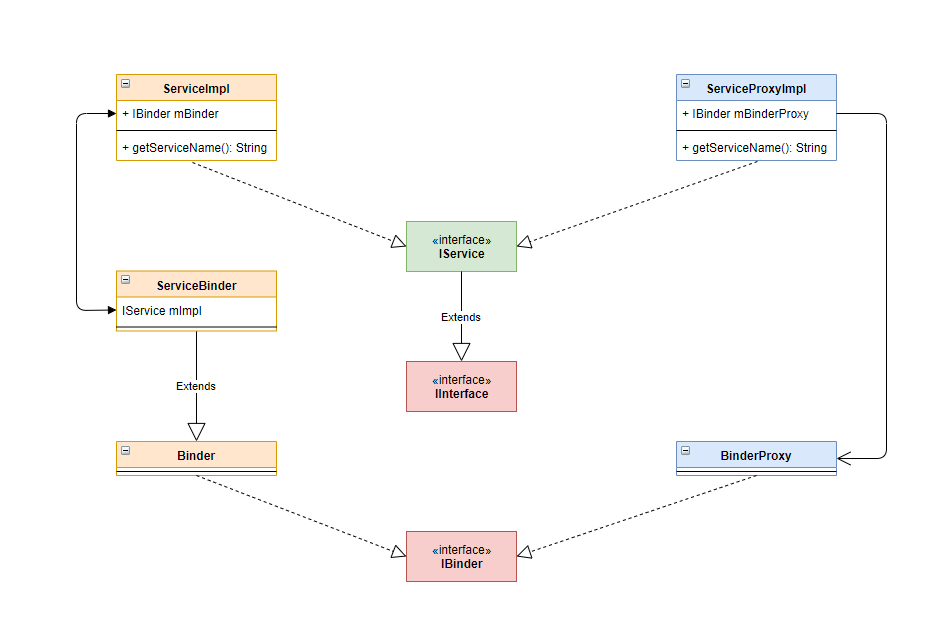
好的, 可以看到服务端在实现交互规范时, 持有一个 IBinder 对象, 它的实现类为 ServiceBinder, 称之为 Binder 本地对象, 服务端的数据, 就是通过它发送到客户端的;
ServiceBinder 中同样的也持有 IService 的实现, 用于写入数据
三. 客户端实现
/**
 * 接口 IService 在客户端的代理实现类
 * {@link #mBinderProxy } 这个对象即 BinderProxy {@link android.os.Binder#BinderProxy} 实例的引用
 *
 * @author Sharry <a href="SharryChooCHN@Gmail.com">Contact me.</a>
 * @version 1.0
 * @since 2018/9/29 16:36
 */
public class ServiceProxyImpl implements IService {

    private IBinder mBinderProxy;

    public ServiceProxyImpl(IBinder binder) {
        mBinderProxy = binder;
    }

    @Override
    public String getServiceName() throws RemoteException {
        String result = null;
        Parcel data = Parcel.obtain();
        Parcel replay = Parcel.obtain();
        try {
            // 1. 写入调用方法所对应接口的描述
            data.writeInterfaceToken(DESCRIPTOR);
            // 2. 向 Service 端发起 invocation 请求
            mBinderProxy.transact(IService.TRANSACTION_getServiceName, data, replay, 0);
            // 3. 读取 Service 端扔出来的异常信息
            replay.readException();
            // 4. 读取异常结果
            result = replay.readString();
        } finally {
            replay.recycle();
            data.recycle();
        }
        return result;
    }

    @Override
    public IBinder asBinder() {
        return mBinderProxy;
    }

}
与服务端类似的, 客户端在实现交互规范时, 也持有一个 IBinder 对象, 它的实现类为 BinderProxy 即 Binder 代理对象, 用于接收服务端发送的数据
总结
Binder 驱动在 Java 层, 通过 IBinder 提供服务
- 服务端使用 Binder 本地对象
- 客户端使用 BinderProxy 代理对象
想要使用 Binder 驱动进行跨进程通信, 主要分为三步
- 定义交互规范
- 服务端实现
- 客户端实现
其结构关系如下
