前言
之前的 Android 系统架构中我们分析了 Android 应用层的图形架构, 忽然发现应用进程还少了一个 Service 的启动没有分析
这里我们便看看 Service 的启动流程
// 发起者
class ClientActivity extends AppCompatActivity {
     ......
     override fun onCreate(savedInstanceState: Bundle?) {
        super.onCreate(savedInstanceState)
        setContentView(R.layout.activity_main)
        val intent = Intent(this, TargetService::class.java)
        startService(intent)
    }
}

// 目标服务, 与发起者不在同一个进程
public class TargetService extends Service {
    ......
}
我们就从 startService 为入口, 看看服务是如何启动起来的
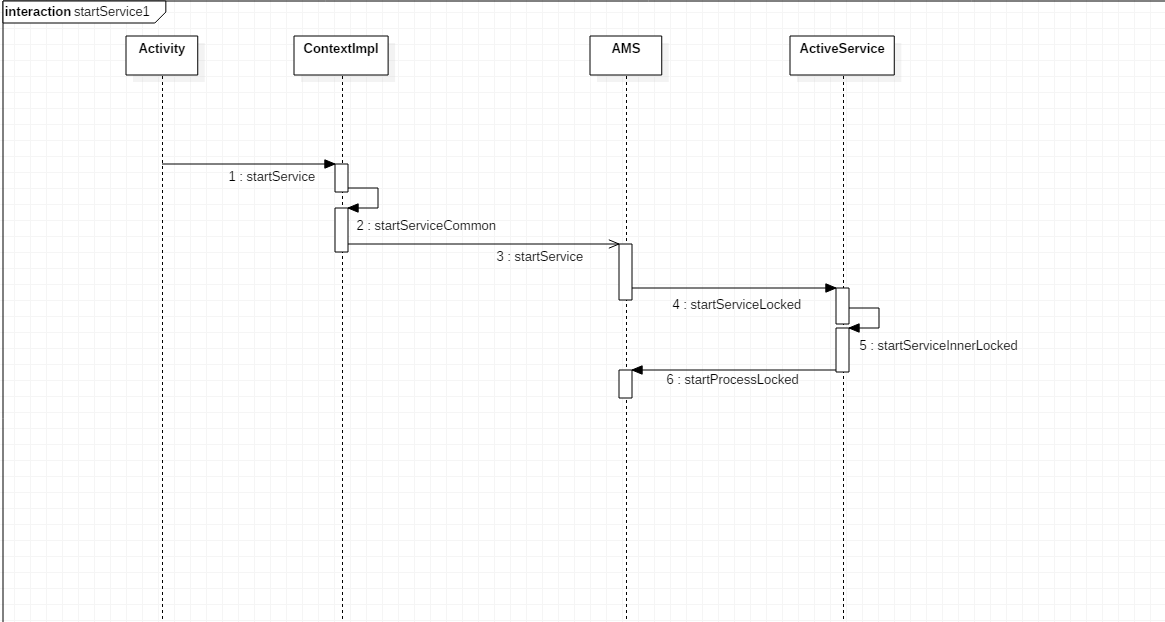
一. 服务启动的发起
我们看看它的启动流程
class ContextImpl {

    @Override
    public ComponentName startService(Intent service) {
        warnIfCallingFromSystemProcess();
        // 回调了 startServiceCommon 方法
        return startServiceCommon(service, false, mUser);
    }


    private ComponentName startServiceCommon(Intent service, boolean requireForeground,
            UserHandle user) {
        try {
            ......
            // 可见调用了 AMS 的 startService, 通过 Activity 启动的分析, 我们对 AMS 已经相当熟悉了
            ComponentName cn = ActivityManager.getService().startService(
                mMainThread.getApplicationThread(), service, service.resolveTypeIfNeeded(
                            getContentResolver()), requireForeground,
                            getOpPackageName(), user.getIdentifier());
            ......
            return cn;
        } catch (RemoteException e) {
            ......
        }
    }
}
可见在请求发起端的进程, 我们主要是将需要启动的 Service 数据传递给了 AMS, 让它来完成启动操作
二. AMS 启动服务
class ActivityManagerService {

    @Override
    public ComponentName startService(IApplicationThread caller, Intent service,
            String resolvedType, boolean requireForeground, String callingPackage, int userId)
            throws TransactionTooLargeException {
        synchronized(this) {
            // 获取调用者的 pid
            final int callingPid = Binder.getCallingPid();
            // 获取调用者的 UID
            final int callingUid = Binder.getCallingUid();
            final long origId = Binder.clearCallingIdentity();
            ComponentName res;
            try {
                // 调用了 startServiceLocked
                res = mServices.startServiceLocked(caller, service,
                        resolvedType, callingPid, callingUid,
                        requireForeground, callingPackage, userId);
            } finally {
                ......
            }
            return res;
        }
    }

}

class ActiveService {
     ......
     ComponentName startServiceLocked(IApplicationThread caller, Intent service, String resolvedType,
            int callingPid, int callingUid, boolean fgRequired, String callingPackage, final int userId)
            throws TransactionTooLargeException {

        final boolean callerFg;
        if (caller != null) {
            // 获取调用者进程的描述一个 ProcessRecord 对象
            final ProcessRecord callerApp = mAm.getRecordForAppLocked(caller);
            if (callerApp == null) {
                ......
            }
            callerFg = callerApp.setSchedGroup != ProcessList.SCHED_GROUP_BACKGROUND;
        } else {
            callerFg = true;
        }
        // 通过 retrieveServiceLocked 获取一个找寻服务结果的对象 ServiceLookupResult
        ServiceLookupResult res =
            retrieveServiceLocked(service, resolvedType, callingPackage,
                    callingPid, callingUid, userId, true, callerFg, false, false);
        // 从找寻结果对象中, 获取要启动服务的描述
        ServiceRecord r = res.record;
        // 初始化其相关成员变量
        r.lastActivity = SystemClock.uptimeMillis();
        r.startRequested = true;
        r.delayedStop = false;
        r.fgRequired = fgRequired;
        r.pendingStarts.add(new ServiceRecord.StartItem(r, false, r.makeNextStartId(),
                service, neededGrants, callingUid));
        // 调用 startServiceInnerLocked 继续执行服务的启动
        ComponentName cmp = startServiceInnerLocked(smap, service, r, callerFg, addToStarting);
        return cmp;
    }
    ......
}
可以看到 AMS 调用了其内部成员变量 mServices 的 startServiceLocked 来执行服务的启动, 而 ActiveService.startServiceLocked 主要做了如下操作
- 获取请求发起进程, 即 ClientActivity 所在进程的描述对象 ProcessRecord
- 通过 retrieveServiceLocked 获取目标服务查询结果的对象 ServiceLookupResult
- 通过 ServiceLookupResult 获取要启动的服务的描述 ServiceRecord
- 调用了 startServiceInnerLocked 继续执行服务的启动
接下来我们就看看 startServiceInnerLocked 做了些什么
class ActiveService {
    ......
    ComponentName startServiceInnerLocked(ServiceMap smap, Intent service, ServiceRecord r,
            boolean callerFg, boolean addToStarting) throws TransactionTooLargeException {
        // 调用了 bringUpServiceLocked
        String error = bringUpServiceLocked(r, service.getFlags(), callerFg, false, false);
        ......
        return r.name;
    }

    private String bringUpServiceLocked(ServiceRecord r, int intentFlags, boolean execInFg,
            boolean whileRestarting, boolean permissionsReviewRequired)
            throws TransactionTooLargeException {
        ......
        // 若这个服务已经启动了, 则调用 sendServiceArgsLocked 去回调 onStartCommand, 这里就不赘述了
        if (r.app != null && r.app.thread != null) {
            sendServiceArgsLocked(r, execInFg, false);
            return null;
        }
        ......
        // 1. 用于判断是否是要启动非请求进程的服务, 即与 ClientActivity 不同进程的服务
        final boolean isolated = (r.serviceInfo.flags&ServiceInfo.FLAG_ISOLATED_PROCESS) != 0;
        ProcessRecord app;
        if (!isolated) {
            // 2. 获取服务进程的描述
            app = mAm.getProcessRecordLocked(procName, r.appInfo.uid, false);
            if (app != null && app.thread != null) {
                try {
                    // 2.1 若这个进程不为 null,说明已经启动了, 则调用 realStartServiceLocked 真正执行这个服务的启动
                    realStartServiceLocked(r, app, execInFg);
                    return null;
                } catch (TransactionTooLargeException e) {
                    throw e;
                } catch (RemoteException e) {
                    Slog.w(TAG, "Exception when starting service " + r.shortName, e);
                }
                // If a dead object exception was thrown -- fall through to
                // restart the application.
            }
        } else {
            ......
        }

        // 3. 执行到这里说明, TargetService 与其请求者处于不同进程
        if (app == null && !permissionsReviewRequired) {
            // 3.1 调用 startProcessLocked 启动服务所在进程
            if ((app=mAm.startProcessLocked(procName, r.appInfo, true, intentFlags,
                    hostingType, r.name, false, isolated, false)) == null) {
                // 执行到这里说明这个进程启动 fork 失败了
                ......
            }
        }
        // 4. 走到这里说明服务进程真正启动中, 因为要调用 ActivityThread 中的 main 方法
        if (!mPendingServices.contains(r)) {
            // 因此将这个要启动服务, 添加到 mPendingServices 集合中缓存
            mPendingServices.add(r);
        }
        .....
        return null;
    }
    ......
}
好的总结一下, bringUpServiceLocked 这个方法做了哪些操作
- 获取 TargetService 所在进程的描述 app
- 若 app 不为 null, 则说明启动服务所在进程已存在
- 直接调用 realStartServiceLocked 真正执行服务启动
- 若 app 为 null, 则会调用 startProcessLocked fork 新的进程
- 若 fork 成功, 此时会调用 ActivityThread 中 main 方法
- 将待启动的服务的描述添加到 ActiveService 中的 mPendingServices 中缓存
- 挂起等待其所在进程启动成功之后, 再从 mPendingServices 取数据, 执行启动操作
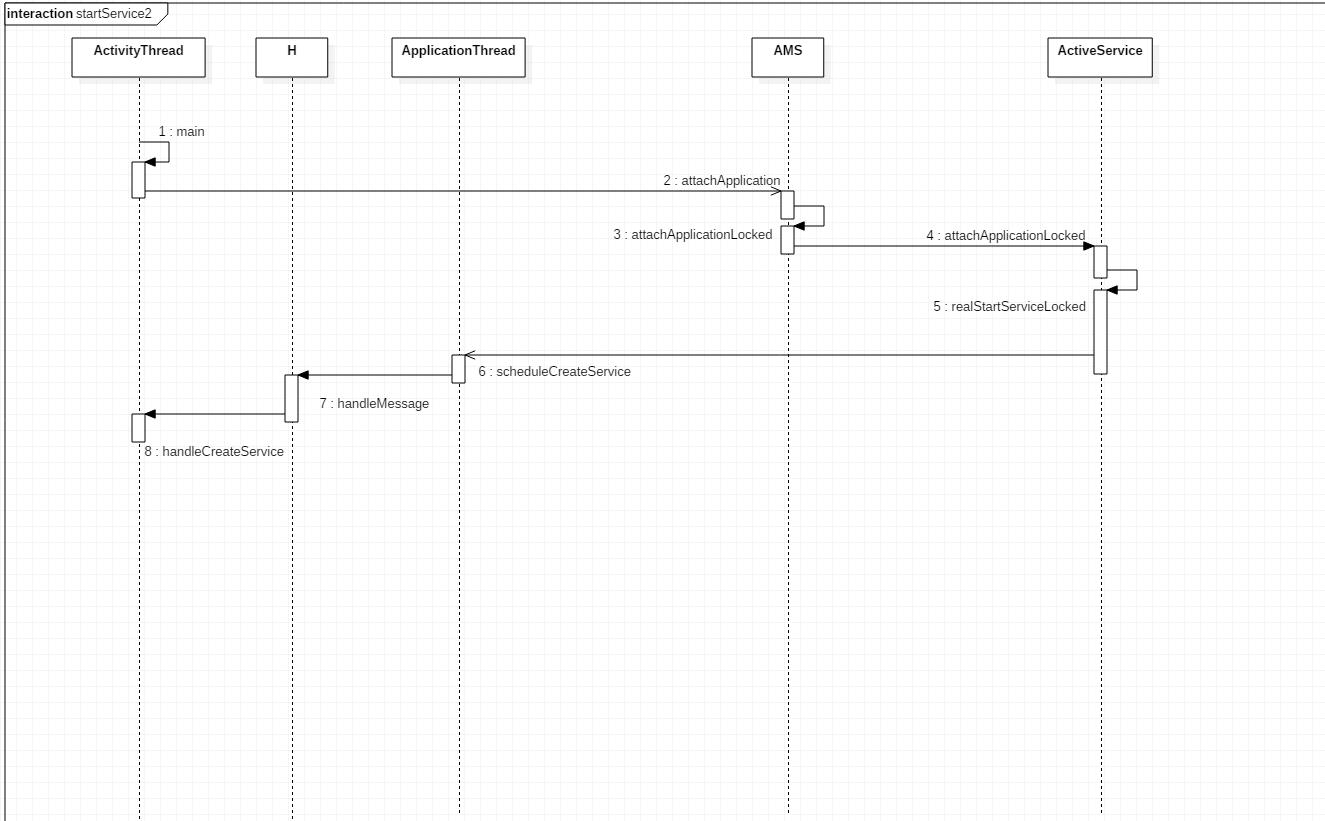
至此 AMS 进程便会等待新进程启动的回调, 这个过程与启动新进程的中 Activity 类似, 当新的进程启动完成之后, 它会调用 attachApplication 通知 AMS 它启动完毕了
接下来我们看看 attachApplication 中做了什么
三. 服务进程启动完毕, 通知 AMS 进行后续操作
class ActivityServiceManager {
    ......
    @Override
    public final void attachApplication(IApplicationThread thread, long startSeq) {
        synchronized (this) {
            int callingPid = Binder.getCallingPid();
            final int callingUid = Binder.getCallingUid();
            final long origId = Binder.clearCallingIdentity();
            // 调用了 attachApplicationLocked
            attachApplicationLocked(thread, callingPid, callingUid, startSeq);
            ......
        }
    }


    private final boolean attachApplicationLocked(IApplicationThread thread,
            int pid, int callingUid, long startSeq) {

        ProcessRecord app;
        .....
        // 移除启动一个进程, 回调超时的的 msg
        mHandler.removeMessages(PROC_START_TIMEOUT_MSG, app);

        // 查找是否有需要在这个进程中启动的服务
        // Find any services that should be running in this process...
        if (!badApp) {
            try {
                // 调用 ActiveService 的 attachApplicationLocked 方法
                didSomething |= mServices.attachApplicationLocked(app, processName);
                ......
            } catch (Exception e) {
                ......
            }
        }
        return true;
    }
}

class ActiveService {

    boolean attachApplicationLocked(ProcessRecord proc, String processName)
            throws RemoteException {
        boolean didSomething = false;
        // Collect any services that are waiting for this process to come up.
        if (mPendingServices.size() > 0) {
            ServiceRecord sr = null;
            try {
                // 遍历 mPendingServices 集合, 获取未启动服务的描述
                for (int i=0; i<mPendingServices.size(); i++) {
                    sr = mPendingServices.get(i);
                    // 判断 sr 是否是要在 proc 进程中启动的服务
                    if (proc != sr.isolatedProc && (proc.uid != sr.appInfo.uid
                            || !processName.equals(sr.processName))) {
                        continue;
                    }
                    // 走到这里说明 sr 就要要在 proc 中启动的服务
                    mPendingServices.remove(i);
                    i--;
                    // 调用 realStartServiceLocked 真正执行服务的启动
                    realStartServiceLocked(sr, proc, sr.createdFromFg);
                    didSomething = true;

                }
            } catch (RemoteException e) {
                ......
            }
        }
        ......
        return didSomething;
    }

}
可以看到, 当目标进程启动之后, 会遍历 mPendingServices 集合, 判断是否有需要在新进程中启动的服务, 若找到相应的服务, 则会调用 realStartServiceLocked 方法, 真正的执行服务的启动, 接下来我们就重点看看这个方法
四. 处理服务的启动
class ActiveService {

    private final void realStartServiceLocked(ServiceRecord r,
            ProcessRecord app, boolean execInFg) throws RemoteException {

        // 向 app 这个进程描述中, 添加一个即将启动的服务描述
        final boolean newService = app.services.add(r);
        ......
        boolean created = false;
        try {
            // 很重要的一点, 调用了 AppliactionThread.scheduleCreateService 去执行服务的启动
            app.thread.scheduleCreateService(r, r.serviceInfo,
                    mAm.compatibilityInfoForPackageLocked(r.serviceInfo.applicationInfo),
                    app.repProcState);
            ......
            created = true;
        } catch (DeadObjectException e) {
            ......
        } finally {
            ......
        }
        ......
    }

}
ActiveService.realStartServiceLocked 非常简单, 调用了 ApplicationThread 的 scheduleCreateService, 去执行服务的启动
public final class ActivityThread extends ClientTransactionHandler {

    private class ApplicationThread extends IApplicationThread.Stub {

        public final void scheduleCreateService(IBinder token,
                ServiceInfo info, CompatibilityInfo compatInfo, int processState) {
            // 创建一个存储要启动服务相关数据的对象
            CreateServiceData s = new CreateServiceData();
            s.token = token;
            s.info = info;
            s.compatInfo = compatInfo;
            // 发送给 Handler 处理
            sendMessage(H.CREATE_SERVICE, s);
        }

    }

    class H extends Handler {

        public void handleMessage(Message msg) {
             ......
             case CREATE_SERVICE:
                    // 调用了 ActivityThread 的 handleCreateService
                    handleCreateService((CreateServiceData)msg.obj);
                    Trace.traceEnd(Trace.TRACE_TAG_ACTIVITY_MANAGER);
                    break;
            ......
        }

    }

    private void handleCreateService(CreateServiceData data) {
        LoadedApk packageInfo = getPackageInfoNoCheck(
                data.info.applicationInfo, data.compatInfo);
        Service service = null;
        try {
            // 获取 ClassLoader 对象
            java.lang.ClassLoader cl = packageInfo.getClassLoader();
            // 1. 获取 AppComponentFactory 来实例化一个服务对象
            service = packageInfo.getAppFactory()
                    .instantiateService(cl, data.info.name, data.intent);
        } catch (Exception e) {
            ......
        }
        try {
            // 2. 创建上下文
            ContextImpl context = ContextImpl.createAppContext(this, packageInfo);
            // 3. 设置这个上下文实例的外部引用者
            context.setOuterContext(service);
            // 4. 获取 Application 对象
            Application app = packageInfo.makeApplication(false, mInstrumentation);
            // 5. 给服务绑定数据
            service.attach(context, this, data.info.name, data.token, app,
                    ActivityManager.getService());
            // 6. 回调 onCreate
            service.onCreate();
            // 添加到缓存中
            mServices.put(data.token, service);
            try {
                // 通知 AMS 服务创建成功了
                ActivityManager.getService().serviceDoneExecuting(
                        data.token, SERVICE_DONE_EXECUTING_ANON, 0, 0);
            } catch (RemoteException e) {
                ......
            }
        } catch (Exception e) {
            ......
        }
    }
}
可以看到 ActiveService.realStartServiceLocked 会调用对应进程的 ApplicationThread 的代理方法 scheduleCreateService 来启动一个服务, 最终会回到服务进程中调用 handleCreateService 来处理服务的启动, 主要做了如下几个事情
- 实例化 Service 对象
- 创建系统的上下文
- 将这个系统的上下文与 Service 绑定
- 获取 Application 实例对象
- 回调 Service.onCreate() 方法
至此, 服务的启动就完成了
总结
服务的启动过程还是非常简单的, 它主要有以下几步
- AMS 进程的 ActiveService 获取 SeriveRecord 对象, 不存在则创建一个
- 通过 SeriveRecord 处理服务的启动
- 若服务已经启动的, 则回调 onStartCommand, 不会重新启动
- 若服务在另一个进程
- 另一个进程已经启动, 则回调 onCreate
- 若未启动, 启动完毕后, 通知 AMS 回调 onCreate
好的, 通过这里我们可以看到, 一个进程中的服务若已经启动, 是不会二次启动的, 再次调用 startService, 只会回调其 onStartCommand 方法