前言
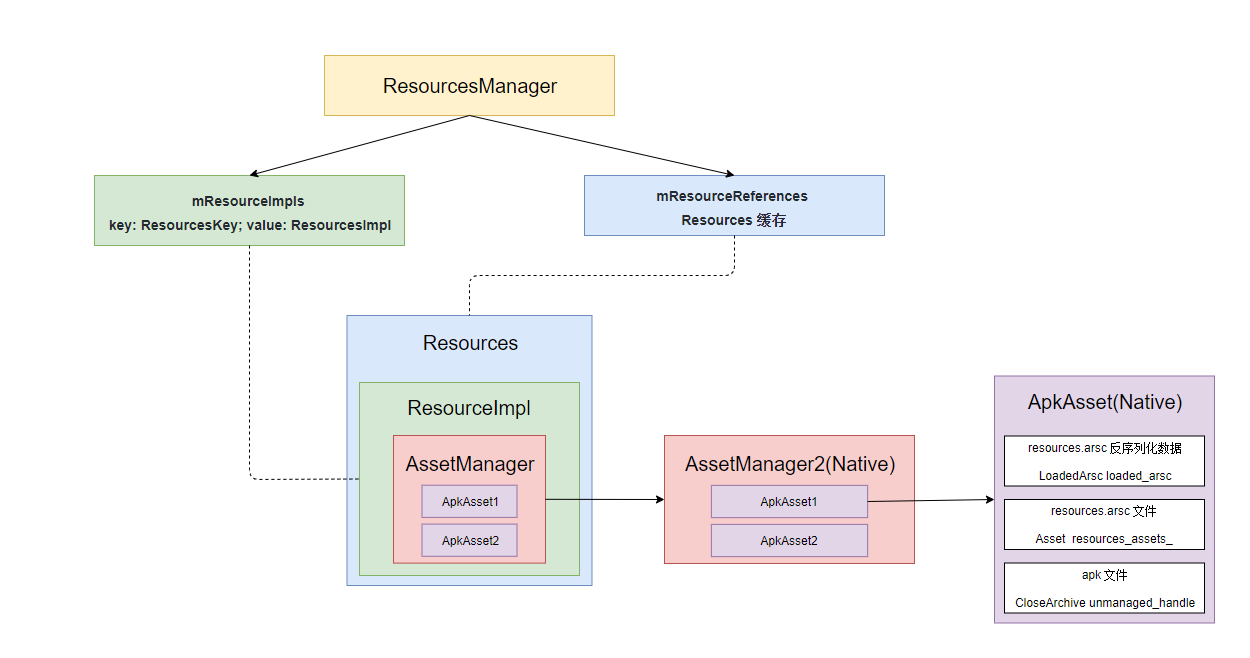
在前面的学习中, 我们学习了资源管理器的初始化流程, 了解应用程序的资源是在什么地方管理的, 先回顾一下资源管理对象之间的依赖
我们知道我们在开发过程中使用的资源主要有两种
- 一种是通过文件相对路径访问的 asset 资源
- 另一种是通过 ID 访问的 res 资源
它们访问的入口均为 Resources 对象, 也就是说最终会通过 AssetManager 获取真正的数据, 这篇文章就以获取 layout 的 XML 资源为例, 学习一下资源获取的流程
获取 Layout 资源
public abstract class LayoutInflater {

    public View inflate(@LayoutRes int resource, @Nullable ViewGroup root, boolean attachToRoot) {
        // 获取 Resources 对象
        final Resources res = getContext().getResources();
        .......
        // 根据资源 layout ID 获取这个 Layout 的 XML 解析器
        final XmlResourceParser parser = res.getLayout(resource);
        try {
            // 解析 XML 数据, 实例化 View
            return inflate(parser, root, attachToRoot);
        } finally {
            parser.close();
        }
    }

}
上面的代码是我们开发过程中实例化 View 的常见操作, 可以看到在实例化 View 之前, 需要通过 Resources.getLayout 获取这个 layoutId 对应的二进制 Xml 布局的解析器
下面我们就探究一下 Resources.getLayout 是如何通过 ID 找到对应资源
public class Resources {

    public XmlResourceParser getLayout(@LayoutRes int id) throws NotFoundException {
        return loadXmlResourceParser(id, "layout");
    }

    XmlResourceParser loadXmlResourceParser(@AnyRes int id, @NonNull String type)
            throws NotFoundException {
        // 构建一个传出参数, 用于接收 Native 的数据
        final TypedValue value = obtainTempTypedValue();
        try {
            // 1. 通过 ResourcesImpl.getValue, 获取 ID 对应的 XML 的路径, 数据保存到 TypedValue 中
            final ResourcesImpl impl = mResourcesImpl;
            impl.getValue(id, value, true);
            // 2. 通过 XML 文件路径, 构建该 XML 文件的解析器 XmlResourceParser
            if (value.type == TypedValue.TYPE_STRING) {
                return impl.loadXmlResourceParser(value.string.toString(), id,
                        value.assetCookie, type);
            }
            ......
        } finally {
            ......
        }
    }

}
可以看到 Resources 的 getLayout 方法主要操作如下
- 通过 ResourcesImpl.getValue 方法获取 ID 对应的资源数据, 并且注入传出参数 TypedValue 中
- 根据资源路径创建当前 XML 文件的解析器
接下来我们就从这两个方面来分析资源获取的流程
一. 根据 ResourceId 查找资源路径
下面我们看看 ResourcesImpl.getValue 的实现
public class ResourcesImpl {

    final AssetManager mAssets;

    void getValue(@AnyRes int id, TypedValue outValue, boolean resolveRefs)
            throws NotFoundException {
        boolean found = mAssets.getResourceValue(id, 0, outValue, resolveRefs);
        if (found) {
            return;
        }
        throw new NotFoundException("Resource ID #0x" + Integer.toHexString(id));
    }

}

public final class AssetManager implements AutoCloseable {

    boolean getResourceValue(@AnyRes int resId, int densityDpi, @NonNull TypedValue outValue,
            boolean resolveRefs) {
        synchronized (this) {
            ......
            // 1. 通过 nativeGetResourceValue 去 Native 层获取数据
            final int cookie = nativeGetResourceValue(
                    mObject, resId, (short) densityDpi, outValue, resolveRefs);

            if (cookie <= 0) {
                return false;
            }
            ......
            // 2. 若资源值为 String 类型, 则从 ApkAssets 的 GlobalStringPool 中获取对应的数据
            if (outValue.type == TypedValue.TYPE_STRING) {
                outValue.string = mApkAssets[cookie - 1].getStringFromPool(outValue.data);
            }
            return true;
        }
    }

}
从这里可以看到 AssetManager 的 getResourceValue 做了如下的事务
- 调用 nativeGetResourceValue 方法, 到 Native 层进行资源的查找操作
- 若查找到的资源类型为 String 类型, 则到对应的 ApkAssets 的 StringPool 中获取具体数据
一) Native 查找资源
下面我们去 native 层看看这个资源查找的过程
// frameworks/base/core/jni/android_util_AssetManager.cpp
static jint NativeGetResourceValue(JNIEnv* env, jclass /*clazz*/, jlong ptr, jint resid,
                                   jshort density, jobject typed_value,
                                   jboolean resolve_references) {
  // 获取 Native 实现对象 AssetManager2
  ScopedLock<AssetManager2> assetmanager(AssetManagerFromLong(ptr));
  Res_value value;
  ResTable_config selected_config;
  uint32_t flags;
  // 1. 调用 AssetManager2.GetResource, 获取这个 resid 对应的资源数据
  ApkAssetsCookie cookie =
      assetmanager->GetResource(static_cast<uint32_t>(resid), false /*may_be_bag*/,
                                static_cast<uint16_t>(density), &value, &selected_config, &flags);
  ......
  uint32_t ref = static_cast<uint32_t>(resid);
  // 2. 解析资源引用, 由之前的传参可知, 这里为 true
  if (resolve_references) {
    cookie = assetmanager->ResolveReference(cookie, &value, &selected_config, &flags, &ref);
    ......
  }
  // 3. 将解析到的资源数据注入到 typed_value 中
  return CopyValue(env, cookie, value, ref, flags, &selected_config, typed_value);
}
可以看到 native 层的资源查找主要有三个步骤
- 调用 AssetManager2.GetResource查找资源
- 调用 AssetManager2.ResolveReference 解析资源引用
- 调用 CopyValue 将 Res_value 拷贝到 java 的 TypeValue 中
接下来我们先看看 GetResources 查找资源的过程
1. GetResources 查找资源
// frameworks/base/libs/androidfw/AssetManager2.cpp
ApkAssetsCookie AssetManager2::GetResource(uint32_t resid, bool may_be_bag,
                                           uint16_t density_override, Res_value* out_value,
                                           ResTable_config* out_selected_config,
                                           uint32_t* out_flags) const {
  FindEntryResult entry;

  // 1. 调用 FindEntry 函数, 找寻 resid 的资源, 保存在 FindEntryResult 中
  ApkAssetsCookie cookie =
      FindEntry(resid, density_override, false /* stop_at_first_match */, &entry);

  ......
  // 2. 若为复杂的资源, 则保存资源的引用
  if (dtohs(entry.entry->flags) & ResTable_entry::FLAG_COMPLEX) {
    ......
    // Create a reference since we can't represent this complex type as a Res_value.
    out_value->dataType = Res_value::TYPE_REFERENCE;
    out_value->data = resid;
    // 保存资源记录的条目
    *out_selected_config = entry.config;
    *out_flags = entry.type_flags;
    return cookie;
  }

  // 3. 若为 values 类型的资源, 则将数据直接注入到 out_value 中
  const Res_value* device_value = reinterpret_cast<const Res_value*>(
      reinterpret_cast<const uint8_t*>(entry.entry) + dtohs(entry.entry->size));
  out_value->copyFrom_dtoh(*device_value);

  ......

  return cookie;
}
AssetManager2::GetResource 是查找资源的核心实现了, 其主要步骤如下
- 通过 FindEntry 到资源表中查找资源
- 若为复杂的资源, 则将资源项的引用注入到 out_selected_config, 等待后续解析
- 若为简单的资源, 直接将数据拷贝到 out_value 中即可
在上面流程中我们看到复杂资源和简单资源的描述
- 复杂资源: 即资源表无法保存的资源, 也就是 drawable 中的图片和 XML 类型的文件
- 这种类型的资源, 资源表只会保存其相对路径, 需要时从路径中解析
- 简单资源: 即 res/values/ 目录下保存的资源如 id, color, string….
- 这种类型的资源, 会直接保存到资源表中, 直接读取即可
了解了资源的类型, 下面我们重点看看查找的核心方法 FindEntry
FindEntry 获取资源项数据
// frameworks/base/libs/androidfw/AssetManager2.cpp
ApkAssetsCookie AssetManager2::FindEntry(uint32_t resid, uint16_t density_override,
                                         bool /*stop_at_first_match*/,
                                         FindEntryResult* out_entry) const {

  // Might use this if density_override != 0.
  ResTable_config density_override_config;

  // Select our configuration or generate a density override configuration.
  const ResTable_config* desired_config = &configuration_;
  if (density_override != 0 && density_override != configuration_.density) {
    density_override_config = configuration_;
    density_override_config.density = density_override;
    desired_config = &density_override_config;
  }
  ......
  const uint32_t package_id = get_package_id(resid); // 获取运行时 packageId
  const uint8_t type_idx = get_type_id(resid) - 1;   // 获取资源的类型 ID
  const uint16_t entry_idx = get_entry_id(resid);    // 获取资源的数据项 ID

  // 1. 根据运行时 package_id 找到它在 package_groups_ 中的索引位置 package_idx
  const uint8_t package_idx = package_ids_[package_id];
  ......
  // 2. 获取运行时 ID 对应的 PackageGroup
  const PackageGroup& package_group = package_groups_[package_idx];

  const size_t package_count = package_group.packages_.size();

  ApkAssetsCookie best_cookie = kInvalidCookie;
  const LoadedPackage* best_package = nullptr;
  const ResTable_type* best_type = nullptr;
  const ResTable_config* best_config = nullptr;
  ResTable_config best_config_copy;
  uint32_t best_offset = 0u;
  uint32_t type_flags = 0u;

  ......

  // 从 PacakgeGroup 中的资源包 LoadedPackage 中获取数据
  for (size_t pi = 0; pi < package_count; pi++) {
    const ConfiguredPackage& loaded_package_impl = package_group.packages_[pi];

    // 3. 获取 LoadedPackage 对象
    const LoadedPackage* loaded_package = loaded_package_impl.loaded_package_;

    ApkAssetsCookie cookie = package_group.cookies_[pi];

    // 4. 从 LoadedPackage 中通过 type_idx 获取资源类型对象 TypeSpec
    const TypeSpec* type_spec = loaded_package->GetTypeSpecByTypeIndex(type_idx);
    ......

    uint16_t local_entry_idx = entry_idx;

    ......

    // 5. 查找资源
    // 5.1 从 FilteredConfigGroup 缓存查找资源
    if (use_fast_path) {

      ...... // 暂不关心

    }
    // 5.2 从 type_spec 中查找资源
    else {
      const auto iter_end = type_spec->types + type_spec->type_count;
      // 5.2.1 遍历 TypeSpec 中的资源项 ResTable_type
      for (auto iter = type_spec->types; iter != iter_end; ++iter) {
        // 5.2.2 获取资源项配置信息
        ResTable_config this_config;

        // 5.2.3 验证是否与期望配置项匹配
        this_config.copyFromDtoH((*iter)->config);
        if (this_config.match(*desired_config)) {

          if ((best_config == nullptr || this_config.isBetterThan(*best_config, desired_config)) ||
              (package_is_overlay && this_config.compare(*best_config) == 0)) {

            // 5.2.4 根据 local_entry_idx 找到资源值的偏移量
            const uint32_t offset = LoadedPackage::GetEntryOffset(*iter, local_entry_idx);

            if (offset == ResTable_type::NO_ENTRY) {
              continue;
            }

            // 记录资源值相关信息
            best_cookie = cookie;
            // 记录资源包
            best_package = loaded_package;
            // 记录资源项对象
            best_type = *iter;
            // 记录配置信息
            best_config_copy = this_config;
            best_config = &best_config_copy;
            // 记录偏移量
            best_offset = offset;
          }

        }
      }
    }
  }

  ......

  // 6. 根据 资源项 和 资源值偏移量 找到资源值
  const ResTable_entry* best_entry = LoadedPackage::GetEntryFromOffset(best_type, best_offset);

  ......

  // 7. 保存到 out_entry 中
  out_entry->entry = best_entry;
  out_entry->config = *best_config;
  out_entry->type_flags = type_flags;
  // 注入资源类型的字符串引用
  out_entry->type_string_ref = StringPoolRef(best_package->GetTypeStringPool(), best_type->id - 1);
  // 注入资源项值的字符串引用
  out_entry->entry_string_ref =
      StringPoolRef(best_package->GetKeyStringPool(), best_entry->key.index);
  out_entry->dynamic_ref_table = &package_group.dynamic_ref_table;
  return best_cookie;
}
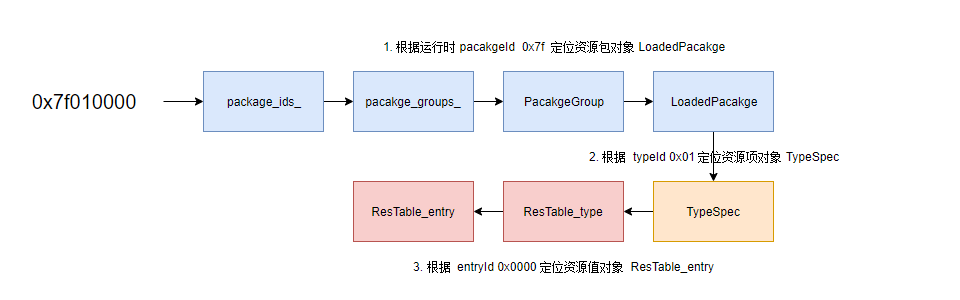
上述的流程还是非常清晰的
- 根据运行时 packageId 从 package_ids_ 取出 pacakge_groups_ 的索引 package_idx
- 根据索引 package_idx 从 pacakge_groups_ 中取出 PacakgeGroup
- 从 PacakgeGroup 中取出 LoadedPackage 对象
- 根据资源 typeId 从 LoadedPacakge 中 取出 TypeSpec
- 查找 entryId 对应的资源项和资源值偏移量
- 从 FilteredConfigGroup 缓存查找资源
- 遍历 TypeSpec 中的资源项 ResTable_type 的集合
- 验证资源项的配置信息, 是否与期望的配置信息匹配
- 若匹配, 则在该资源项中获取这个 entryId 的偏移量
- 若偏移量有效, 则记录资源项对象描述到 best_type, 记录偏移量到 best_offset
- 若匹配, 则在该资源项中获取这个 entryId 的偏移量
- 验证资源项的配置信息, 是否与期望的配置信息匹配
- 根据 best_type 和 best_offset 找到的资源值对象 ResTable_entry
- 将数据注入到 FindEntryResult 中
通过上面的步骤, 我们就成功的通过 resId 定位到资源值对象 ResTable_entry 了, 资源查找的流程如下
2. 解析资源引用
// frameworks/base/libs/androidfw/AssetManager2.cpp
ApkAssetsCookie AssetManager2::ResolveReference(ApkAssetsCookie cookie, Res_value* in_out_value,
                                                ResTable_config* in_out_selected_config,
                                                uint32_t* in_out_flags,
                                                uint32_t* out_last_reference) const {
  // 最大查找次数为 20 层
  constexpr const int kMaxIterations = 20;
  // 判断当前解析到的资源 in_out_value 的类型是否为 TYPE_REFERENCE
  for (size_t iteration = 0u; in_out_value->dataType == Res_value::TYPE_REFERENCE&&
                              in_out_value->data != 0u && iteration < kMaxIterations;
       iteration++) {
    // 获取引用
    *out_last_reference = in_out_value->data;
    uint32_t new_flags = 0u;
    // 再次调用 GetResource 解析资源的引用
    cookie = GetResource(in_out_value->data, true /*may_be_bag*/, 0u /*density_override*/,
                         in_out_value, in_out_selected_config, &new_flags);
    if (cookie == kInvalidCookie) {
      return kInvalidCookie;
    }
    if (in_out_flags != nullptr) {
      *in_out_flags |= new_flags;
    }
    if (*out_last_reference == in_out_value->data) {
      // This reference can't be resolved, so exit now and let the caller deal with it.
      return cookie;
    }
  }
  return cookie;
}
可以看到 ResolveReference 函数是为了解决之前我们之前解析到的资源项的值指向了另一个资源 ID 的情况, 最常见的为 style 的嵌套引用

针对这种情况我们需要再次进行解析操作, 其 kMaxIterations 限制了引用的深度, 最高支持 20 层的引用
3. 拷贝数据到 TypeValued
// frameworks/base/core/jni/android_util_AssetManager.cpp
static jint CopyValue(JNIEnv* env, ApkAssetsCookie cookie, const Res_value& value, uint32_t ref,
                      uint32_t type_spec_flags, ResTable_config* config, jobject out_typed_value) {
  // 拷贝数据类型
  env->SetIntField(out_typed_value, gTypedValueOffsets.mType, value.dataType);
  // 拷贝 cookie, 即 packageId 的索引
  env->SetIntField(out_typed_value, gTypedValueOffsets.mAssetCookie,
                   ApkAssetsCookieToJavaCookie(cookie));
  // 给 mData 属性赋值
  env->SetIntField(out_typed_value, gTypedValueOffsets.mData, value.data);
  // 给 mString 赋值, 始终为 null
  env->SetObjectField(out_typed_value, gTypedValueOffsets.mString, nullptr);
  // 给 mResourceId 赋值
  env->SetIntField(out_typed_value, gTypedValueOffsets.mResourceId, ref);
  // 给 mChangingConfigurations 赋值
  env->SetIntField(out_typed_value, gTypedValueOffsets.mChangingConfigurations, type_spec_flags);
  if (config != nullptr) {
    // 给 mDensity 赋值
    env->SetIntField(out_typed_value, gTypedValueOffsets.mDensity, config->density);
  }
  return static_cast<jint>(ApkAssetsCookieToJavaCookie(cookie));
}
CopyValue 的实现, 即通过 JNIEnv 将解析到的资源数据拷贝到 Java 的 TypedValue 中, 其中需要注意的是 TypedValue 中 mString 的数据是恒定为 null 的, 这意味着我们还需要从 GloabStringPool 中根据 StringId 进行二次查找才能够找到真正的数据
接下来我们看看 Java 层是如何通过 StringId 获取到真正的资源路径的
二) 从 String 池获取数据
public final class ApkAssets {

    @GuardedBy("this") private StringBlock mStringBlock;

    CharSequence getStringFromPool(int idx) {
        synchronized (this) {
            return mStringBlock.get(idx);
        }
    }

}
ApkAssets 中直接调用了 StringBlock 的 get 方法来获取真正的 String 数据
我们在上一篇文章中分析过 ApkAssets 的构造, 其中 StringBlock 是 Java 层访问 GlobalStringPool 的入口, 下面我们看看根据 Id 获取 String 的过程
final class StringBlock {

    private final long mNative;
    private CharSequence[] mStrings;
    private SparseArray<CharSequence> mSparseStrings;

    public CharSequence get(int idx) {
        synchronized (this) {
            // 1. 从缓存获取
            if (mStrings != null) {
                // 直接从 mStirngs 中根据 id index 获取
                CharSequence res = mStrings[idx];
                if (res != null) {
                    return res;
                }
            } else if (mSparseStrings != null) {
                // 通过 mSparseStrings 获取
                CharSequence res = mSparseStrings.get(idx);
                if (res != null) {
                    return res;
                }
            }
            // 1.1 若缓存不存在, 则构建缓存
            else {
                // 获取 Native 层字符串池的大小
                final int num = nativeGetSize(mNative);
                if (mUseSparse && num > 250) {
                    // 超过 250 使用 SparseArray 存储
                    mSparseStrings = new SparseArray<CharSequence>();
                } else {
                    // 低于 250 使用 String 暂存
                    mStrings = new CharSequence[num];
                }
            }

            // 2. 从 native 层根据 idx 查找字符串
            String str = nativeGetString(mNative, idx);
            CharSequence res = str;


            .......// 对 style 进行特殊处理

            // 3. 缓存数据
            // 缓存到 mStrings 中
            if (mStrings != null) {
                mStrings[idx] = res;
            }
            // 缓存到 mSparseStrings 中
            else {
                mSparseStrings.put(idx, res);
            }
            return res;
        }
    }
}
StringBlock 中维护了两个缓存池, 字符串池中的数据量量低于 250 使用数组缓存, 高于 250 使用 SparseArray 缓存, 通过 id 查找资源的过程如下
- 优先从 Java 缓存池中获取
- 若缓存不存在, 则构建缓存
- 到 Native 层根据 idx 查找数据
- 投放到 Java 缓存池
这里思考一下为什么 Android 要将资源值的字符串池暴露到 Java 层来访问呢?
- 资源的字符串是高频访问的资源, 而且资源值的字符串加载到内存中就基本不会再变更了, 总结下来它具有访问 高频性 和 资源稳定性, 因此 Android 采用了数组和散列的方式进行 Java 层的缓存, 减少了进入 Native 带来的性能损耗
三) 回顾
根据 ResourceId 查找资源路径的主要步骤如下
- 从资源表查找资源
- 调用 AssetManager2.GetResource查找资源
- 调用 AssetManager2.ResolveReference 解析资源引用
- 最深引用层级为 20 层
- 调用 CopyValue 将 Res_value 拷贝到 java 的 TypeValue 中
- String 类型的资源需要二次查找
- 从 String 池获取资源路径
- 优先从 Java 缓存池中获取
- 若缓存不存在, 则构建缓存
- 到 Native 层根据 idx 查找数据
- 投放到 Java 缓存池
- 优先从 Java 缓存池中获取
二. 创建 XML 资源文件解析器
public class ResourcesImpl {

    XmlResourceParser loadXmlResourceParser(@NonNull String file, @AnyRes int id, int assetCookie,
            @NonNull String type)
            throws NotFoundException {
        if (id != 0) {
            try {
                synchronized (mCachedXmlBlocks) {
                    // 1. 从缓存中查找
                    final int[] cachedXmlBlockCookies = mCachedXmlBlockCookies;
                    final String[] cachedXmlBlockFiles = mCachedXmlBlockFiles;
                    final XmlBlock[] cachedXmlBlocks = mCachedXmlBlocks;
                    // First see if this block is in our cache.
                    final int num = cachedXmlBlockFiles.length;
                    for (int i = 0; i < num; i++) {
                        if (cachedXmlBlockCookies[i] == assetCookie && cachedXmlBlockFiles[i] != null
                                && cachedXmlBlockFiles[i].equals(file)) {
                            return cachedXmlBlocks[i].newParser();
                        }
                    }

                    // 2. 使用 AssetsManager 来打开 Xml 文件
                    final XmlBlock block = mAssets.openXmlBlockAsset(assetCookie, file);
                    if (block != null) {
                        // 2.1 添加到缓存
                        final int pos = (mLastCachedXmlBlockIndex + 1) % num;
                        mLastCachedXmlBlockIndex = pos;
                        final XmlBlock oldBlock = cachedXmlBlocks[pos];
                        if (oldBlock != null) {
                            oldBlock.close();
                        }
                        cachedXmlBlockCookies[pos] = assetCookie;
                        cachedXmlBlockFiles[pos] = file;
                        cachedXmlBlocks[pos] = block;
                        // 3. 创建一个 XmlResourceParser 对象
                        return block.newParser();
                    }
                }
            } catch (Exception e) {
                ......
                throw rnf;
            }
        }
        ......
    }

}

final class XmlBlock implements AutoCloseable {

    private final long mNative;


    public XmlResourceParser newParser() {
        synchronized (this) {
            if (mNative != 0) {
                return new Parser(nativeCreateParseState(mNative), this);
            }
            return null;
        }
    }

    final class Parser implements XmlResourceParser {

        Parser(long parseState, XmlBlock block) {
            mParseState = parseState;
            mBlock = block;
            block.mOpenCount++;
        }

    }

}
loadXmlResourceParser 中所做的操作如下
- 优先从缓存中获取 xml file 对应的 XmlBlock 对象
- 通过 AssetManager 打开资源文件获取 XmlBlock 对象
- 通过 XmlBlock.newParser 创建 XmlResourceParser
其他流程都比较简单, 这里我们重点我们看看 AssteManager 是如何打开 XML 资源文件
public final class AssetManager implements AutoCloseable {

    @NonNull XmlBlock openXmlBlockAsset(int cookie, @NonNull String fileName) throws IOException {
        ......
        synchronized (this) {
            ......
            // 1. 调用 nativeOpenXmlAsset 在 native 层执行打开操作
            final long xmlBlock = nativeOpenXmlAsset(mObject, cookie, fileName);
            if (xmlBlock == 0) {
                throw new FileNotFoundException("Asset XML file: " + fileName);
            }
            // 2. 创建 Java 层的 XmlBlock
            final XmlBlock block = new XmlBlock(this, xmlBlock);
            ......
            return block;
        }
    }
}
从这里我们可以看到 Java 层的 XmlBlock 就是一个壳对象, 我们看看 nativeOpenXmlAsset 是如何打开 Xml 资源文件的
// frameworks/base/core/jni/android_util_AssetManager.cpp
static jlong NativeOpenXmlAsset(JNIEnv* env, jobject /*clazz*/, jlong ptr, jint jcookie,
                                jstring asset_path) {
  ApkAssetsCookie cookie = JavaCookieToApkAssetsCookie(jcookie);
  ......
  ScopedLock<AssetManager2> assetmanager(AssetManagerFromLong(ptr));
  std::unique_ptr<Asset> asset;
  if (cookie != kInvalidCookie) {
    // 1. AssetManager2.OpenNonAsset 打开 XML 资源文件
    asset = assetmanager->OpenNonAsset(asset_path_utf8.c_str(), cookie, Asset::ACCESS_RANDOM);
  } else {
    ......
  }
  ......
  // 获取 cookie 对应 PacakgeGroup 的动态引用表
  const DynamicRefTable* dynamic_ref_table = assetmanager->GetDynamicRefTableForCookie(cookie);
  // 创建 ResXMLTree 对象
  std::unique_ptr<ResXMLTree> xml_tree = util::make_unique<ResXMLTree>(dynamic_ref_table);
  // 2. 将打开的 Asset 中的 XML 资源数据注入到 ResXMLTree 中
  status_t err = xml_tree->setTo(asset->getBuffer(true), asset->getLength(), true);
  ......
  // 5. 返回到 Java 层
  return reinterpret_cast<jlong>(xml_tree.release());
}
可以看到 NativeOpenXmlAsset 中有两步操作
- 调用 AssetManager2.OpenNonAsset 获取 XML 文件资源的 Asset 对象
- 将 Asset 数据注入到 ResXMLTree 中
接下来我们主要查看 Asset 对象的构建, 和 ResXMLTree 的数据注入流程
一) 获取 XML 文件资源的 Asset 对象
// frameworks/base/libs/androidfw/include/androidfw/AssetManager2.h
std::unique_ptr<Asset> AssetManager2::OpenNonAsset(const std::string& filename,
                                                   ApkAssetsCookie cookie,
                                                   Asset::AccessMode mode) const {
  if (cookie < 0 || static_cast<size_t>(cookie) >= apk_assets_.size()) {
    return {};
  }
  // 根据 cookie 找到对应的 ApkAssets, 调用 ApkAssets 的 Open 打开 XML 文件
  return apk_assets_[cookie]->Open(filename, mode);
}
可以看到 AssetManager2::OpenNonAsset 将文件打开操作交由 ApkAssets 来处理
我们从上一篇文章资源管理的创建流程中知道, 一个 .apk 中的资源包加载内存之后就对应一个 ApkAssets, 下面看看它是如何打开 XML 文件的
// frameworks/base/libs/androidfw/ApkAssets.cpp
std::unique_ptr<Asset> ApkAssets::Open(const std::string& path, Asset::AccessMode mode) const {
  CHECK(zip_handle_ != nullptr);
  ::ZipString name(path.c_str());
  ::ZipEntry entry;
  // 1. 从 .apk 压缩包中查找 path 对应的文件
  int32_t result = ::FindEntry(zip_handle_.get(), name, &entry);
  if (result != 0) {
    // 不存在则返回空对象
    return {};
  }
  // 2. 从 .apk 文件中, 将我们要找寻的文件提取出来
  // 2.1 提取压缩的问题
  if (entry.method == kCompressDeflated) {
    // 通过 FileMap, 将我们的文件提取到内存
    std::unique_ptr<FileMap> map = util::make_unique<FileMap>();
    if (!map->create(path_.c_str(), ::GetFileDescriptor(zip_handle_.get()), entry.offset,
                     entry.compressed_length, true /*readOnly*/)) {
      ......
    }
    // 通过 Asset::createFromCompressedMap 创建 Asset 对象
    std::unique_ptr<Asset> asset =
        Asset::createFromCompressedMap(std::move(map), entry.uncompressed_length, mode);
    ......
    return asset;
  }
  // 2.2 打开未压缩的文件
  else {
    // 通过 FileMap 将文件 mmap 到内存
    std::unique_ptr<FileMap> map = util::make_unique<FileMap>();
    if (!map->create(path_.c_str(), ::GetFileDescriptor(zip_handle_.get()), entry.offset,
                     entry.uncompressed_length, true /*readOnly*/)) {
      ......
      return {};
    }
    // 创建 Asset 对象
    std::unique_ptr<Asset> asset = Asset::createFromUncompressedMap(std::move(map), mode);
    if (asset == nullptr) {
      ......
      return {};
    }
    return asset;
  }
}
可以看到 ApkAssets::Open 中做了如下的操作
- 从 .apk 压缩包中查找我们的资源文件的数据项 ZipEntry
- 从 .apk 中将我们的文夹提取出来
- 对于压缩文件
- 通过 FileMap 将资源文件 mmap 到内存
- 通过 Asset::createFromCompressedMap 创建 Asset 对象
- 对于未压缩文件
- 通过 FileMap 将资源文件 mmap 到内存
- 通过 Asset::createFromUncompressedMap 创建 Asset 对象
- 对于压缩文件
现在 Asset 对象已经构建好了, 接下来看看它是如何将数据注入到 ResXMLTree 中的
二) 将 Asset 数据注入 ResXMLTree
/ frameworks/base/libs/androidfw/ResourceTypes.cpp
status_t ResXMLTree::setTo(const void* data, size_t size, bool copyData)
{
    uninit();
    mEventCode = START_DOCUMENT;

    if (!data || !size) {
        return (mError=BAD_TYPE);
    }

    if (copyData) {
        // 开辟一块内存
        mOwnedData = malloc(size);
        if (mOwnedData == NULL) {
            return (mError=NO_MEMORY);
        }
        // 将 data 拷贝到 mOwnedData
        memcpy(mOwnedData, data, size);
        data = mOwnedData;
    }

    mHeader = (const ResXMLTree_header*)data;
    mSize = dtohl(mHeader->header.size);
    if (dtohs(mHeader->header.headerSize) > mSize || mSize > size) {
        ......
        mError = BAD_TYPE;
        restart();
        return mError;
    }
    mDataEnd = ((const uint8_t*)mHeader) + mSize;

    mStrings.uninit();
    mRootNode = NULL;
    mResIds = NULL;
    mNumResIds = 0;

    // First look for a couple interesting chunks: the string block
    // and first XML node.
    const ResChunk_header* chunk =
        (const ResChunk_header*)(((const uint8_t*)mHeader) + dtohs(mHeader->header.headerSize));

    const ResChunk_header* lastChunk = chunk;
    while (((const uint8_t*)chunk) < (mDataEnd-sizeof(ResChunk_header)) &&
           ((const uint8_t*)chunk) < (mDataEnd-dtohl(chunk->size))) {
        status_t err = validate_chunk(chunk, sizeof(ResChunk_header), mDataEnd, "XML");
        if (err != NO_ERROR) {
            mError = err;
            goto done;
        }
        const uint16_t type = dtohs(chunk->type);
        const size_t size = dtohl(chunk->size);
        ......
        if (type == RES_STRING_POOL_TYPE) {
            // 解析 XML 中的 String 池
            mStrings.setTo(chunk, size);
        } else if (type == RES_XML_RESOURCE_MAP_TYPE) {
            // 解析 XML 中的 ID 池
            mResIds = (const uint32_t*)
                (((const uint8_t*)chunk)+dtohs(chunk->headerSize));
            mNumResIds = (dtohl(chunk->size)-dtohs(chunk->headerSize))/sizeof(uint32_t);
        } else if (type >= RES_XML_FIRST_CHUNK_TYPE
                   && type <= RES_XML_LAST_CHUNK_TYPE) {
            if (validateNode((const ResXMLTree_node*)chunk) != NO_ERROR) {
                mError = BAD_TYPE;
                goto done;
            }
            mCurNode = (const ResXMLTree_node*)lastChunk;
            if (nextNode() == BAD_DOCUMENT) {
                mError = BAD_TYPE;
                goto done;
            }
            mRootNode = mCurNode;
            mRootExt = mCurExt;
            mRootCode = mEventCode;
            break;
        } else {
           ......
        }
        lastChunk = chunk;
        chunk = (const ResChunk_header*)
            (((const uint8_t*)chunk) + size);
    }

    if (mRootNode == NULL) {
        ......
        mError = BAD_TYPE;
        goto done;
    }

    mError = mStrings.getError();

done:
    restart();
    return mError;
}
ResXMLTree::setTo 操作, 初步解析 Asset 中的二进制 XML 数据的过程如下
- 将数据拷贝到 mOwnedData 中
- 获取 XML 中的 String 池
- 获取 XML 中的 ID 池
好的, 到这里 XML 文件就加载到内存并且初始化完毕了
回到 java 层之后, 会将 ResXMLTree 句柄值保存 XmlBlock 对象中, 进而构建 XmlResourceParser 对象, 如此依赖 XML 解析器就构建完毕了
三) 回顾
创建 XML 资源文件解析器的流程如下
- AssetManager 打开资源文件
- 获取 XML 文件资源的 Asset 对象
- 从 .apk 压缩包中查找我们的资源文件的数据项 ZipEntry
- 从 .apk 中将我们的文夹提取出来
- 对于压缩文件
- 通过 FileMap 将资源文件 mmap 到内存
- 通过 Asset::createFromCompressedMap 创建 Asset 对象
- 对于未压缩文件
- 通过 FileMap 将资源文件 mmap 到内存
- 通过 Asset::createFromUncompressedMap 创建 Asset 对象
- 对于压缩文件
- 将 Asset 数据注入 ResXMLTree
- 保存二进制 XML 数据到 mOwnedData
- 获取 XML 的 String 池
- 获取 XML 的 ID 池
- 将 ResXMLTree 保存到 XmlBlock 中
- 获取 XML 文件资源的 Asset 对象
- 构建 XmlResourceParser
总结
Android 获取 layout 资源的流程主要有资源的查找和构建解析器两个步骤, 具体的流程如下
查找资源
- 从资源表查找资源
- 调用 AssetManager2.GetResource 查找资源
- 调用 AssetManager2.ResolveReference 解析资源引用
- 最深引用层级为 20 层
- 调用 CopyValue 将 Res_value 拷贝到 java 的 TypeValue 中
- String 类型的资源需要二次查找
- 从 String 池获取资源路径
- 优先从 Java 缓存池中获取
- 若缓存不存在, 则构建缓存
- 到 Native 层根据 idx 查找数据
- 投放到 Java 缓存池
- 优先从 Java 缓存池中获取
构建解析器
- AssetManager 打开资源文件
- 获取 XML 文件资源的 Asset 对象
- 从 .apk 压缩包中查找我们的资源文件的数据项 ZipEntry
- 从 .apk 中将我们的文夹提取出来
- 对于压缩文件
- 通过 FileMap 将资源文件 mmap 到内存
- 通过 Asset::createFromCompressedMap 创建 Asset 对象
- 对于未压缩文件
- 通过 FileMap 将资源文件 mmap 到内存
- 通过 Asset::createFromUncompressedMap 创建 Asset 对象
- 对于压缩文件
- 将 Asset 数据注入 ResXMLTree
- 保存二进制 XML 数据到 mOwnedData
- 获取 XML 的 String 池
- 获取 XML 的 ID 池
- 将 ResXMLTree 保存到 XmlBlock 中
- 获取 XML 文件资源的 Asset 对象
- 构建 XmlResourceParser
Android 资源管理机制是非常复杂的, 这里只是 layout 的查找与解析器构建的流程, 还有很多资源查找的案例需要我们去分析, 不过大体上流程应该是类相似的
参考文献
- https://www.jianshu.com/p/b153d63d60b3
- https://blog.csdn.net/luoshengyang/article/details/8806798