前言
我们平时开发的过程中最常打交道的是 View 和 Window, 他们是能够呈现视图的关键所在, 这里我们以 Activity 的启动为例, 从如下三个方面来了解一下图形渲染的准备过程
- Window 的创建与初始化
- 为 Window 填充 View
- 与 WMS 建立联系
下面我们一一分析
一. Window 的创建与初始化
public final class ActivityThread extends ClientTransactionHandler {

    private Activity performLaunchActivity(ActivityClientRecord r, Intent customIntent) {
        ......
        try {
            Application app = r.packageInfo.makeApplication(false, mInstrumentation);
            if (activity != null) {
                ......
                // 给 Activity 绑定数据
                activity.attach(appContext, this, getInstrumentation(), r.token,
                        r.ident, app, r.intent, r.activityInfo, title, r.parent,
                        r.embeddedID, r.lastNonConfigurationInstances, config,
                        r.referrer, r.voiceInteractor, window, r.configCallback);
                ......
                if (r.isPersistable()) {
                    // 回调 OnCreate()
                    mInstrumentation.callActivityOnCreate(activity, r.state, r.persistentState);
                } else {
                    mInstrumentation.callActivityOnCreate(activity, r.state);
                }
                ......
            }
            ......

        }
        ......
        return activity;
    }

}
在 Activity 创建的方法中可以看到, 我们在回调 onCreate 之前调用了 Activity 的 attach 方法, 为 Activity 注入参数, 这个我们的图形渲染架构的窗体就在这里创建的
public class Activity extends ContextThemeWrapper {

    final void attach(Context context, ActivityThread aThread,
            Instrumentation instr, IBinder token, int ident,
            Application application, Intent intent, ActivityInfo info,
            CharSequence title, Activity parent, String id,
            NonConfigurationInstances lastNonConfigurationInstances,
            Configuration config, String referrer, IVoiceInteractor voiceInteractor,
            Window window, ActivityConfigCallback activityConfigCallback) {
        ......
        // 1. 构建了 PhoneWindow 对象
        mWindow = new PhoneWindow(this, window, activityConfigCallback);
        ......
        // 2. 给这个 Window 设置了 WindowManager
        mWindow.setWindowManager(
                (WindowManager)context.getSystemService(Context.WINDOW_SERVICE),
                mToken, mComponent.flattenToString(),
                (info.flags & ActivityInfo.FLAG_HARDWARE_ACCELERATED) != 0);
        ......
        // 3. 将与这个 Window 绑定的 WindowManager 保存在 mWindowManager 成员变量中
        mWindowManager = mWindow.getWindowManager();
    }
}
可以看到在 Activity 的 attach 方法中, 关于 Window 它主要做了如下三件事情
- 构建了当前 Activity 的 Window 对象 PhoneWindow
- 给构建的 Window 绑定管理器的 WindowManager
- 将这个 WindowManager 保存到 Activity 的 mWindowManager 中
从这里可以看到 Window 的实例对象为 PhoneWindow, 一个 Window 有一个对应的管理者 WindowManager, 下面我们看看 setWindowManager 的过程
接下来我们看看这个 Window 是如何绑定 WindowManager 的
public class Window {

    public void setWindowManager(WindowManager wm, IBinder appToken, String appName,
            boolean hardwareAccelerated) {
        // 若 wm 为 null, 则当前 Context 在 SystemServiceRegistry 中注册的 WindowManagerImpl 对象
        if (wm == null) {
            wm = (WindowManager)mContext.getSystemService(Context.WINDOW_SERVICE);
        }
        // 通过 WindowManager 的实例创建了一个新的 WindowManager 提供给自己使用
        mWindowManager = ((WindowManagerImpl)wm).createLocalWindowManager(this);
    }

}
很有意思, 在 Window.setWindowManager 时, 若 wm 未传值, 则通过 Context.getSystemService 获取 WindowMangaer 对象, 接着会创建一个新的 WindowMangerIml 对象专门提供给这个 Window 使用
一) 获取 Context 的 WindowManager
我们先看看它是如何通过 Context.getSystemService(Context.WINDOW_SERVICE) 获取 WindowMangerImpl 这个实例对象的
class ContextImpl extends Context {

     @Override
    public Object getSystemService(String name) {
        return SystemServiceRegistry.getSystemService(this, name);
    }

}

final class SystemServiceRegistry {

    // 服务获取器缓存(并非服务对象)
    private static final HashMap<String, ServiceFetcher<?>> SYSTEM_SERVICE_FETCHERS =
            new HashMap<String, ServiceFetcher<?>>();

    public static Object getSystemService(ContextImpl ctx, String name) {
        // 1. 通过 SYSTEM_SERVICE_FETCHERS 缓存的服务获取器
        ServiceFetcher<?> fetcher = SYSTEM_SERVICE_FETCHERS.get(name);
        // 2. 通过服务获取器 fetcher, 获取服务对象
        return fetcher != null ? fetcher.getService(ctx) : null;
    }
}
好的, 可以看到 SystemServiceRegistry 的 getSystemService 方法首先通过缓存获取到了服务获取器的实例, 然后调用获取器的 getService 方法获取了我们需要的 WindowManager 对象
接下来我们看看这个服务获取器在什么地方注册的
1. ServiceFetcher 的注册
final class SystemServiceRegistry {

    // 服务名的缓存
    private static final HashMap<Class<?>, String> SYSTEM_SERVICE_NAMES =
            new HashMap<Class<?>, String>();
    // 服务获取器缓存(并非服务对象)
    private static final HashMap<String, ServiceFetcher<?>> SYSTEM_SERVICE_FETCHERS =
            new HashMap<String, ServiceFetcher<?>>();

    static {
        ......
        // 注册 WINDOW_SERVICE
        registerService(
            Context.WINDOW_SERVICE,
            WindowManager.class,
            // 注册了一个实例获取器
            new CachedServiceFetcher<WindowManager>() {
                @Override
                public WindowManager createService(ContextImpl ctx) {
                    return new WindowManagerImpl(ctx);
                }
            }
        );
        ......
    }

    private static <T> void registerService(String serviceName, Class<T> serviceClass,
            ServiceFetcher<T> serviceFetcher) {
        // 添加到 服务名称 缓存
        SYSTEM_SERVICE_NAMES.put(serviceClass, serviceName);
        // 添加 服务获取器 的缓存
        SYSTEM_SERVICE_FETCHERS.put(serviceName, serviceFetcher);
    }

}
好的可以看到, 服务获取器的注册操作是在 SystemServiceRegistry 类的静态代码块中进行的, 由 JVM 的知识可知, 静态代码块的执行, 是在类加载过程中的初始化阶段进行的, 也就是说只要触发了 SystemServiceRegistry 类初始化, 便会先将所有的服务获取器注册完成
- 注册这个 WINDOW_SERVICE 它 new 了一个 CachedServiceFetcher 服务获取器, 并且重写了其 createService 方法
由上面 SystemServiceRegistry.getSystemService 中的代码可知, 它是使用 ServiceFetcher.getService 获取 WindowManager 对象的, 接下来我们再看看这个服务获取器, 是如何通过 ServiceFetcher.getService 获取我们需要的 WindowManager 对象的
2. CachedServiceFetcher.getService
final class SystemServiceRegistry {

    // 记录所有注册的缓存服务获取器的数量
    private static int sServiceCacheSize;

    static abstract class CachedServiceFetcher<T> implements ServiceFetcher<T> {

        // 构建的时候便会为这个 ServiceFetcher 创建一个 CacheIndex 代表其索引值
        private final int mCacheIndex;

        CachedServiceFetcher() {
            mCacheIndex = sServiceCacheSize++;
        }

        @Override
        @SuppressWarnings("unchecked")
        public final T getService(ContextImpl ctx) {
            // 从 ctx 中获取其中服务缓存数组(大小为 sServiceCacheSize)
            final Object[] cache = ctx.mServiceCache;
            // 从 ctx 中获取缓存的服务状态数组(大小为 sServiceCacheSize)
            final int[] gates = ctx.mServiceInitializationStateArray;

            for (;;) {
                boolean doInitialize = false;
                synchronized (cache) {
                    // 1. 尝试从 Context 的缓存中获取这个服务,
                    // 我们知道这个 Context 是 Activity 创建时构建的一个 ContextImpl 对象
                    // 若是第一次调用 getService, ContextImpl 不存在这个缓存
                    T service = (T) cache[mCacheIndex];
                    if (service != null || gates[mCacheIndex] == ContextImpl.STATE_NOT_FOUND) {
                        // 1.1 若存在, 则直接将这个对象返回给调用方
                        return service;
                    }

                    // 1.2 如果 Context 缓存池中该服务的状态是 STATE_READY, 则说明之前创建过一次, 但实例被恶意清除了
                    if (gates[mCacheIndex] == ContextImpl.STATE_READY) {
                        // 将其置为 UNINITIALIZED 状态
                        gates[mCacheIndex] = ContextImpl.STATE_UNINITIALIZED;
                    }
                    // 1.3 将 doInitialize 置为 true, 状态变更为 INITIALIZING
                    if (gates[mCacheIndex] == ContextImpl.STATE_UNINITIALIZED) {
                        doInitialize = true;
                        gates[mCacheIndex] = ContextImpl.STATE_INITIALIZING;
                    }
                }
                // 2. 创建服务并且缓存到 Context 对象的缓存池中
                if (doInitialize) {
                    T service = null;
                    // 2.1 将这个服务的新状态初始化为 STATE_NOT_FOUND
                    int newState = ContextImpl.STATE_NOT_FOUND;
                    try {
                        // 2.2 这里调用了注册时重写的 createService, 便可拿到这个实例对象了
                        service = createService(ctx);
                        // 2.3 将这个服务的状态初始化为 STATE_READY
                        newState = ContextImpl.STATE_READY;
                    } catch (ServiceNotFoundException e) {
                        ......
                    } finally {
                        // 2.4 在 Context 的服务缓存数组中保存这个服务的缓存
                        synchronized (cache) {
                            cache[mCacheIndex] = service;
                            gates[mCacheIndex] = newState;
                            cache.notifyAll();
                        }
                    }
                    return service;
                }
                ......
            }
        }

        public abstract T createService(ContextImpl ctx) throws ServiceNotFoundException;
    }
}
好的, 可以看到非常有趣, 这个 CachedServiceFetcher 的 Cached 的含义, 并非是缓存在 SystemServiceRegistry 中, 而是缓存 Context 对象的 mServiceCache 中, 也就是说这个 WindowManger 并非是进程间唯一的, 而可能是 Context 对象中唯一的(不恶意修改的情况下), 因此我们可以得出如下的结论
- 通过通过 context.getSystemService(Context.WINDOW_SERVICE) 获取到的对象时 WindowManagerImpl
- 它并非系统服务进程提供的 WindowMangerService 代理对象
- 这个 WindowManagerImpl 并非进程间唯一的, 不同的 Context 通过 getSystemService 获取到的 WindowManagerImpl 实例对象都是不同的
搞清楚了 Context 获取 WindowManager 的过程, 这里再回过头来看看 WindowManagerImpl.createLocalWindowManager 创建新的实例的用意何在
二) 创建本地 WindowManager
public class Window {

    public void setWindowManager(WindowManager wm, IBinder appToken, String appName,
            boolean hardwareAccelerated) {
        // 如何获取 WindowManger 这里已经分析过了
        if (wm == null) {
            wm = (WindowManager)mContext.getSystemService(Context.WINDOW_SERVICE);
        }
        // 通过 WindowManager 的实例创建了一个新的 WindowManager 提供给自己使用
        mWindowManager = ((WindowManagerImpl)wm).createLocalWindowManager(this);
    }

}

public final class WindowManagerImpl implements WindowManager {
    // 管理 Window 真正的实现
    private final WindowManagerGlobal mGlobal = WindowManagerGlobal.getInstance();
    // 上下文
    private final Context mContext;
    // 描述 WindowManager 要管理的 Window
    private final Window mParentWindow;

    // 调用了该方法重新创建了一个 WindowManager
    public WindowManagerImpl createLocalWindowManager(Window parentWindow) {
        // 这里创建时的 Context 沿用了当前对象的成员变量
        return new WindowManagerImpl(mContext, parentWindow);
    }

    // Constructor 1
    public WindowManagerImpl(Context context) {
        this(context, null);
    }

    // Constructor 2
    private WindowManagerImpl(Context context, Window parentWindow) {
        mContext = context;
        mParentWindow = parentWindow;
    }

}
好的, 可以看到 WindowManagerImpl.createLocalWindowManager 对象重新创建了一个 WindowManagerImpl 对象
思考
这里我们可能会有疑问了不能直接使用 Context 缓存的 WindowManager 吗? 创建新的 WindowManager 用意何在呢?
假设我们使用 Context 缓存的 WindowManager 与我们 Activity 中创建的 Window 绑定, 此时我在这个 Activity 中弹出一个 Dialog, 它也会创建一个 Window, 创建 Dialog 时传入的 Context 显然是我们 Activity, 如果它也使用 Context 缓存的 WindowManager 与其创建的 Window 绑定, 那么会出现如下的情况
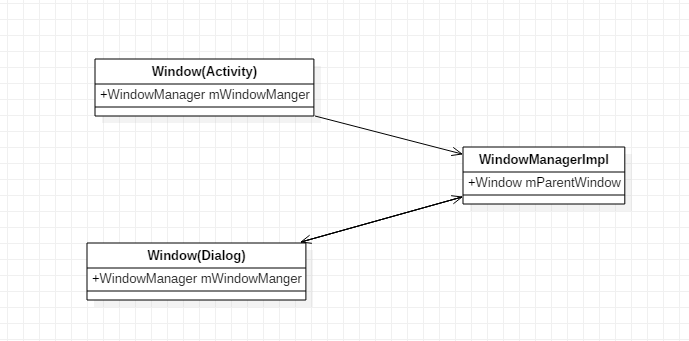
可以看到 Activity 中的 Window 虽然指向了 WindowManager, 但 WindowManager 中的 Window 已经是 Dialog 中的 Window 了, Activity 中 Window 调用相应的方法时, 会发现变更的居然是 Dialog 的 Window, 这显然是不合理的
因此为了保证每一个 Window 都有一个 WindowManager 对其进行管理, WindowManagerImpl 中的将相关变量置为了 final 类型, 每有一个 Window 创建, 便会为其创建一个 WindowManger
三) 回顾
Activity 的 attach 关于 Window 做了如下的事情 c 光有 Window 是呈现不了界面的, 还需要与我们 View 关联起来, 因此我们看看 setContentView 为 Window 装在 View 的过程
二. 为 Window 填充 View
我们知道在 Activity 中调用 setContentView 之后, 页面便会展示我们布局中搭建的视图, 我们就以此为切入点, 看看 Window 是如何关联起 View 的
public class Activity extends ContextThemeWrapper {

    public void setContentView(@LayoutRes int layoutResID) {
        // 获取 Activity.attach 中创建的 PhoneWindow 对象, 调用其 setContentView
        getWindow().setContentView(layoutResID);
        ......
    }

}

public class PhoneWindow extends Window implements MenuBuilder.Callback {

    private LayoutInflater mLayoutInflater;
    ViewGroup mContentParent;

     @Override
    public void setContentView(int layoutResID) {
        if (mContentParent == null) {
            // 1. 给 Window 填充 DecorView
            installDecor();
        } else if (!hasFeature(FEATURE_CONTENT_TRANSITIONS)) {
            ......
        }

        if (hasFeature(FEATURE_CONTENT_TRANSITIONS)) {
            ......// 处理 Sence 场景动画
        } else {
            // 2. 构建我们搭建的布局填充到 mContentParent 中
            mLayoutInflater.inflate(layoutResID, mContentParent);
        }
        ......
    }

}
好的, 可以看到在 PhoneWindow 的 setContentView 中, 做了两件事情
- 给 Window 安装 DecorView
- 将我们传入的布局填充到 mContentParent 中
关于讲我们的 layoutResId 解析成 View 添加到 mContentParent 中的流程就不赘述了、
这里主要看看 Window 是如何安装 DecorView 的
一) 安装 DecorView
public class PhoneWindow extends Window implements MenuBuilder.Callback {

    private void installDecor() {
        if (mDecor == null) {
            // 1. 创建了 DecorView 的对象
            mDecor = generateDecor(-1);
        } else {
            // 若不为null, 则让 DecorView 直接与当前的 Window 对象绑定
            mDecor.setWindow(this);
        }
        // 2. 构建 mContentParent
        if (mContentParent == null) {
            mContentParent = generateLayout(mDecor);
        }
    }
}
安装 DecorView 的过程主要有两步
- 调用 generateDecor 创建 DecorView 对象
- 调用 generateLayout 为 DecorView 注入初始布局
1. 创建 DecorView
public class PhoneWindow extends Window implements MenuBuilder.Callback {

    protected DecorView generateDecor(int featureId) {
        Context context;
        if (mUseDecorContext) {
            ...... // 创建 DecorView 的Context
        } else {
            context = getContext();
        }
        // 1.1 创建了 DecorView, 可以看到 this 为当前 Window 的实例
        return new DecorView(context, featureId, this, getAttributes());
    }

}
这里很简单, 即 new 了一个 DecorView 对象, 下面看看如何为 DecorView 填充布局
2. 为 DecorView 填充布局
public class PhoneWindow extends Window implements MenuBuilder.Callback {

    public static final int ID_ANDROID_CONTENT = com.android.internal.R.id.content;

    protected ViewGroup generateLayout(DecorView decor) {
        ......
        // 1. 找寻 Android 系统提供给 DecorView 的填充布局, 存入 layoutResource 中
        // 这些布局文件中均有一个 ID 为 ID_ANDROID_CONTENT 的 View
        int layoutResource;
        ......

        // 2. 将 layoutResource 布局文件解析成 View 添加到了 DecorView 之中
        mDecor.onResourcesLoaded(mLayoutInflater, layoutResource);
        // 3 通过 findViewById 给 contentParent 赋值
        ViewGroup contentParent = (ViewGroup)findViewById(ID_ANDROID_CONTENT);

        ......
        return contentParent;
    }

    public <T extends View> T findViewById(@IdRes int id) {
        // 通过 DecorView 找寻视图
        return getDecorView().findViewById(id);
    }
}

public class DecorView extends FrameLayout {

   // 若 Window 不需要这个 View, 则为 null
   DecorCaptionView mDecorCaptionView;
   ViewGroup mContentRoot;

   void onResourcesLoaded(LayoutInflater inflater, int layoutResource) {
        mDecorCaptionView = createDecorCaptionView(inflater);
        // 1. 根据 layoutResource 创建 root
        final View root = inflater.inflate(layoutResource, null);
        if (mDecorCaptionView != null) {
            ......
        } else {
            ......
            // 2. 添加到 DecorView 中, 作为其子容器
            addView(root, 0, new ViewGroup.LayoutParams(MATCH_PARENT, MATCH_PARENT));
        }
        // 3. 赋值给成员变量
        mContentRoot = (ViewGroup) root;
    }

}
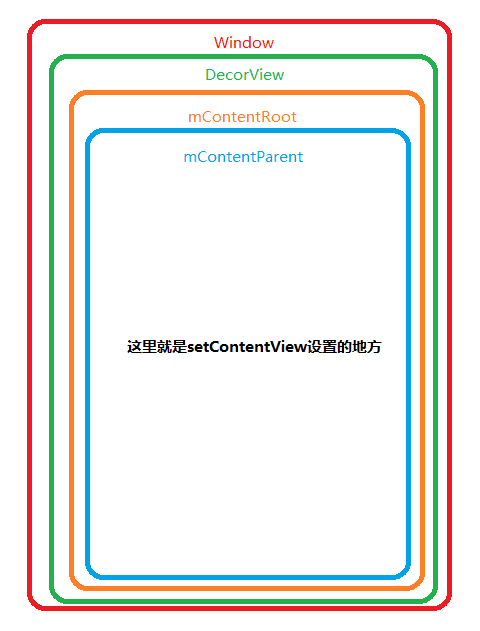
可以看到 generateLayout 会为 DecorView 加载一个填充布局, 这个布局由系统提供其内部一定存在一个 R.id.content 的 View, 它便是后续需要保存到 PhoneWindow 中的 mContentParent
| 容器 | childCount | child |
|---|---|---|
| Window | 1 | DecorView |
| DecorView | 1 | mContentRoot (根据feature拿到的layoutResource 例如: screen_simple.xml) |
| mContentRoot(以screen_simple.xml为例) | 2 | child1: ViewStub(@+id/action_mode_bar_stub) child2: FrameLayout(@android:id/content), 它就是mCotnentParent |
二) 回顾
当我们执行 setContentView 操作时会进行如下操作
- 给 Window 安装 DecorView
- 创建 DecorView
- 为 DecorView 填充布局 mContentRoot
- 将 mContentRoot 中 R.id.content 的 View 保存到 mContentParent
- 将我们传入的布局填充到 mContentParent 中
三. 与 WMS 建立联系
public final class ActivityThread extends ClientTransactionHandler {
@Override
public void handleResumeActivity(IBinder token, boolean finalStateRequest, boolean isForward,
String reason) {
// 执行 Activity 的 onStart 和 onResume 操作
final ActivityClientRecord r = performResumeActivity(token, finalStateRequest, reason);
final Activity a = r.activity;
// mStartedActivity 在这个 Activity 准备跳转到其他页面时, 会被赋值为 true
// 若并非需要跳转到其他页面, 则准备进行这个 Activity 的视图的测量、布局和绘制
boolean willBeVisible = !a.mStartedActivity;
if (r.window == null && !a.mFinished && willBeVisible) {
// 获取 Activity 绑定的 Window
r.window = r.activity.getWindow();
// 获取 Window 中的 DecorView
View decor = r.window.getDecorView();
decor.setVisibility(View.INVISIBLE);
// 获取 Activity 的 WindowManager
ViewManager wm = a.getWindowManager();
// 获取 Window 的布局参数
WindowManager.LayoutParams l = r.window.getAttributes();
......
if (a.mVisibleFromClient) {
if (!a.mWindowAdded) {
a.mWindowAdded = true;
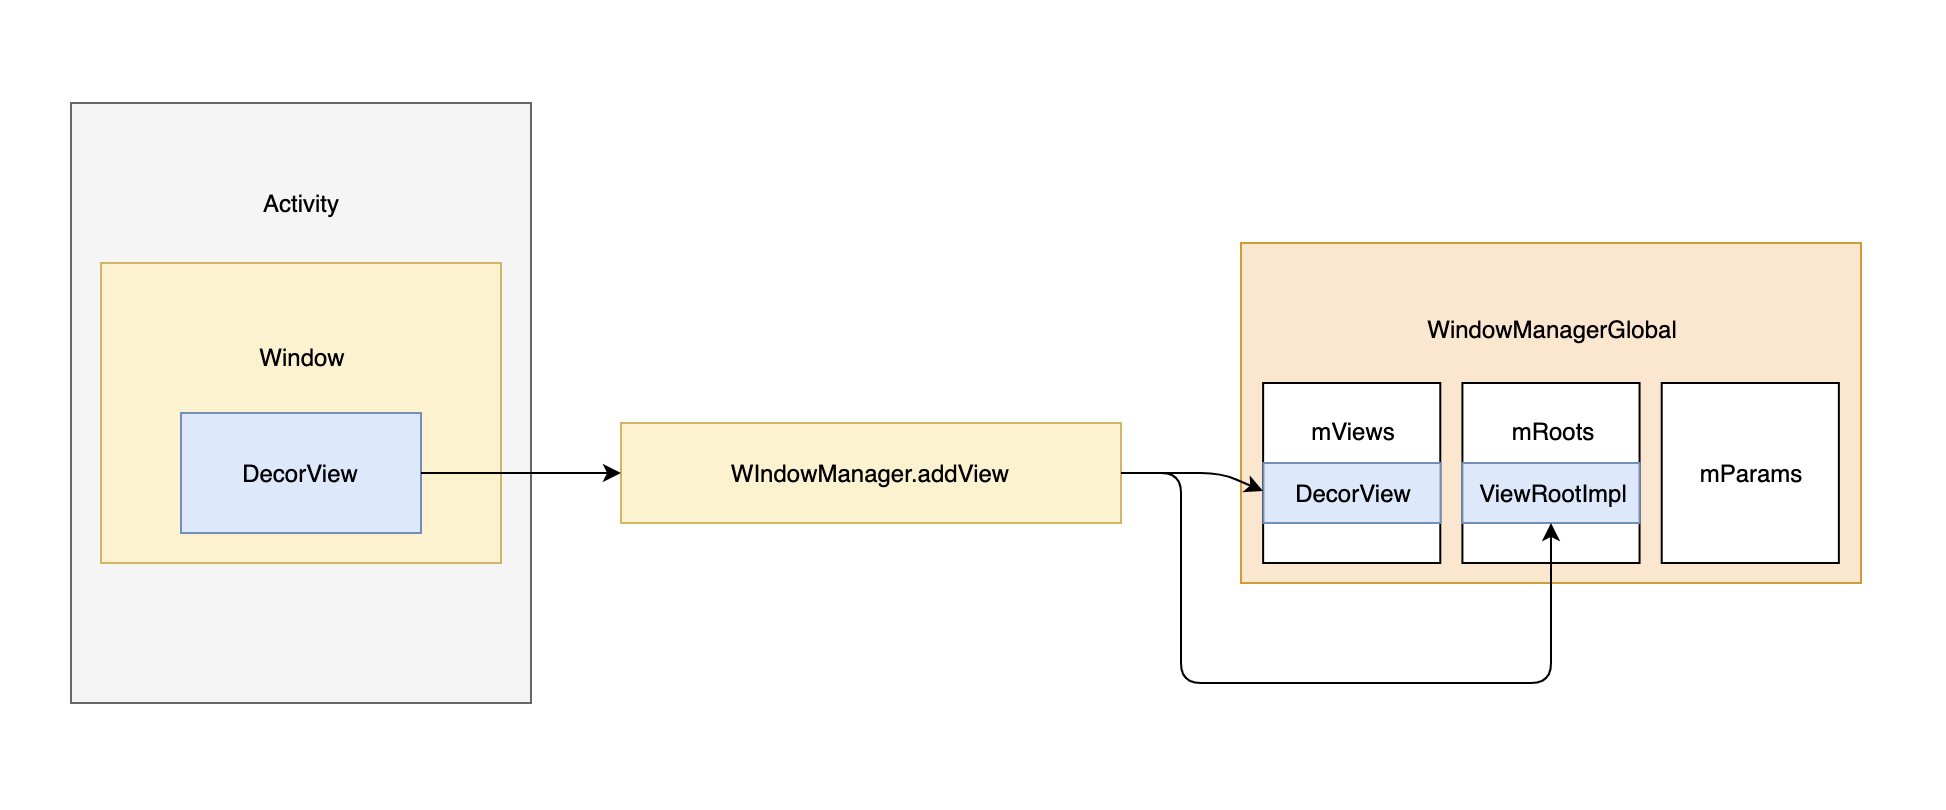
// 将这 DecorView 和该 Window 的布局参数传入 WidnowManager.addView 方法
wm.addView(decor, l);
} else {
......
}
}
.......
} else if (!willBeVisible) {
......
}
......
}
}
可以看到 ActivityThread.handleResumeActivity 在回调了 onStart 和 onResume 之后, 便会处理当前 Window 中的视图
其中最为重要的 wm.addView 这行代码, 它是我们 View 与 WMS 建立连接的关键, 我们看看它的实现
public class WindowManagerImpl implements WindowManager {

    // 桥接对象, 用于转移 WindowManager 中的具体操作
    private final WindowManagerGlobal mGlobal = WindowManagerGlobal.getInstance();
    private final Context mContext;
    private final Window mParentWindow;

    @Override
    public void addView(@NonNull View view, @NonNull ViewGroup.LayoutParams params) {
        ......
        mGlobal.addView(view, params, mContext.getDisplay(), mParentWindow);
    }
}

public final class WindowManagerGlobal {

    private static WindowManagerGlobal sDefaultWindowManager;

    // 获取 WindowManagerGlobal 单例
    // 这种方式显然不够优雅
    public static WindowManagerGlobal getInstance() {
        synchronized (WindowManagerGlobal.class) {
            if (sDefaultWindowManager == null) {
                sDefaultWindowManager = new WindowManagerGlobal();
            }
            return sDefaultWindowManager;
        }
    }
}
好的, 可以看到 WindowManagerImpl.addView 的操作, 直接转发给了 WindowManagerGlobal
我们知道 WindowManager 是为了管理与之绑定的 Window 的, 那么 WindowManagerGlobal 顾名思义它是用于管理当前进程中所有的 Window 的, 从它使用了单例设计模式便可初步印证我们的想法
接下来我们来看看 WindowManagerGlobal 是如何执行 addView 操作的
public final class WindowManagerGlobal {

    // 缓存当前进程中所有的正在展示 DecorView
    private final ArrayList<View> mViews = new ArrayList<View>();
    // 缓存当前进程中所有真正展示的 DecorView 的管理者
    private final ArrayList<ViewRootImpl> mRoots = new ArrayList<ViewRootImpl>();
    // 缓存当前进程中所有 DecorView 的布局参数
    private final ArrayList<WindowManager.LayoutParams> mParams =
            new ArrayList<WindowManager.LayoutParams>();

    public void addView(View view, ViewGroup.LayoutParams params,
            Display display, Window parentWindow) {
        ......
        final WindowManager.LayoutParams wparams = (WindowManager.LayoutParams) params;
        ......
        // 声明 ViewRootImpl
        ViewRootImpl root;
        View panelParentView = null;
        synchronized (mLock) {
            ......// 添加系统属性变更的观察者
            // 1. 查找当前 View 在 mViews 中的索引值
            // 这个 Window 是首次 addView 操作, 显然索引为 -1
            int index = findViewLocked(view, false);
            if (index >= 0) {
                // 1.1 若当前 View 已经被添加到解绑结合中, 则执行 ViewRootImpl 的 doDie 操作
                if (mDyingViews.contains(view)) {
                    mRoots.get(index).doDie();
                } else {
                    // 1.2 这是一个非常常见的异常, 表示这个 DecorView 被重新添加了
                    throw new IllegalStateException("View " + view
                            + " has already been added to the window manager.");
                }
            }
            // 2. 判断当前 Window 是否为 SUB_WINDOW 类型
            if (wparams.type >= WindowManager.LayoutParams.FIRST_SUB_WINDOW &&
                    wparams.type <= WindowManager.LayoutParams.LAST_SUB_WINDOW) {
                // 若是子 Window, 找寻它父 Window 的 DecorView
                final int count = mViews.size();
                for (int i = 0; i < count; i++) {
                    // 通过 wparams 的 token 进行比较
                    // 可以看到找到之后并没有立即 break, 它会找到集合中最后一个匹配的 View
                    // 因为最晚添加的 View 才有可能是它的直接父容器
                    if (mRoots.get(i).mWindow.asBinder() == wparams.token) {
                        panelParentView = mViews.get(i);
                    }
                }
            }
            // 3. 构建了 ViewRootImpl 对象
            root = new ViewRootImpl(view.getContext(), display);
            // 给 DecorView 设置 Window 的布局参数
            view.setLayoutParams(wparams);
            // 4. 添加到缓存中
            mViews.add(view);
            mRoots.add(root);
            mParams.add(wparams);
            try {
                // 5. 给 ViewRootImpl 设置这个 DecorView
                root.setView(view, wparams, panelParentView);
            } catch (RuntimeException e) {
                ......
            }
        }
    }
}
可以看到 WindowManagerGlobal 的 addView 中做了非常重要的操作
- 查找传入的 DecorView 是否已经在 mViews 缓存中了
- 若在缓存中, 则抛出我们熟知的异常, 不允许二次添加
- 判断当前 DecorView 的 LayoutParams 是否 SUB_WINDOW 类型
- 若为子窗口类型, 则遍历集合查找其父窗口的 DecorView
- 构建一个 ViewRootImpl
- 给 DecorView 设置 Window 的布局参数
- 将相关对象添加到 WindowManagerGlobal 的缓存集合中
- 将 DecorView 注入 ViewRootImpl
从这里可以看到 WindowManager 就是一个壳实现, 其 addView 操作直接转发到了 WindowManagerGlobal 中, 从其内部实现可以得知, 一个 DecorView 对应一个 ViewRootImpl, 如果说 DecorView 是根 View, 那么 ViewRootImpl 就肩负着 DecorView 与外界的交互的职责, 比如从与 WMS 交互, 与 IMS 交互等等
接下来我们从 ViewRootImpl 的创建与 ViewRootImpl.setView 来分析它的创建和初始化过程
一) ViewRootImpl 的创建
public final class ViewRootImpl implements ViewParent,
        View.AttachInfo.Callbacks, ThreadedRenderer.DrawCallbacks {

    final Rect mWinFrame;                 // 描述 ViewRootImpl 窗体的大小
    final W mWindow;                      // 描述与需要添加到 WMS 中的窗口的 Binder 实体对象
    final IWindowSession mWindowSession;  // 描述一个与 WMS 建立的连接
    final View.AttachInfo mAttachInfo;    // 描述当前窗体中 View 的依附的信息

    public ViewRootImpl(Context context, Display display) {
        ......
        mContext = context;
        // 1. 与 WMS 交互的 Session
        mWindowSession = WindowManagerGlobal.getWindowSession();
        mWinFrame = new Rect();
        // 2. 描述 WMS 窗体的 Binder 代理对象
        mWindow = new W(this);
        ......
        // 3. 封装依附信息
        mAttachInfo = new View.AttachInfo(mWindowSession, mWindow, display, this, mHandler, this,
                context);
        // 4. 获取渲染编舞者实例对象
        mChoreographer = Choreographer.getInstance();
    }

}
在 ViewRootImpl 的创建流程如下
- 获取了与 WMS 交互的 WindowSession 对象
- 获取 ViewRootImpl 所描述的窗体对应 WMS 的 Binder 代理对象 W
- 创建 AttachInfo 对象, 描述当前窗体关联的数据信息
- 获取 Choreographer 对象, 描述应用进程 UI 渲染的调度器
- 这个对象在 Android 4.1 的时候引入, 配合 VSYNC 信号来, 控制 View 渲染的时机
上面的流程比较清晰, 从其构造可以看出 ViewRootImpl 承担着与 WMS 交互以及 UI 渲染调度的重任
关于 Choreographer 的创建流程, 我们到下一篇文章中重点分析, 这里我们先看看与 WMS 交互的过程
1. IWindowSession 的创建
public final class WindowManagerGlobal {

    private static IWindowManager sWindowManagerService;
    private static IWindowSession sWindowSession;

    public static IWindowSession getWindowSession() {
        synchronized (WindowManagerGlobal.class) {
            if (sWindowSession == null) {
                try {
                    InputMethodManager imm = InputMethodManager.getInstance();
                    // 1. 获取 WMS 的客户端 Binder 代理对象
                    IWindowManager windowManager = getWindowManagerService();
                    // 2. 通过这个代理对象创建一个进程间单例的 IWindowSession Binder 代理对象
                    // 它描述了当前进程与系统服务进行的 WMS 进行会话的桥梁
                    sWindowSession = windowManager.openSession(
                            new IWindowSessionCallback.Stub() {
                                @Override
                                public void onAnimatorScaleChanged(float scale) {
                                    ValueAnimator.setDurationScale(scale);
                                }
                            },
                            imm.getClient(), imm.getInputContext());
                } catch (RemoteException e) {
                    throw e.rethrowFromSystemServer();
                }
            }
            return sWindowSession;
        }
    }

    public static IWindowManager getWindowManagerService() {
        synchronized (WindowManagerGlobal.class) {
            if (sWindowManagerService == null) {
                // 获取了系统服务进程的 WindowManagerService 的 Binder 代理对象, 保存在静态变量中
                sWindowManagerService = IWindowManager.Stub.asInterface(
                        ServiceManager.getService("window"));
                ......
            }
            return sWindowManagerService;
        }
    }
}
可以看到这个 IWindowSession 的构建是在 WindowManagerGlobal 中进行的, 它主要做了两部分操作
- 获取系统服务进程 WindowManagerService 的 Binder 代理对象, 即 WMS
- 通过 openSession, 返回一个 Session 的 Binder 代理对象给我们客户端使用, 进程间单例
这里我们可能会有疑问 WindowManagerService 和 WindowManager 是什么关系?
- WindowManager 是在我们的应用进程中对 Window 进行管理的服务, 并且是一一对应的关系, 可以理解为是更高层的抽象实现, 也就是门面
- 真正用于窗体管理的是在系统服务进程的 WMS, 它是不认是我们上面的 Window 对象的, 因为是跨进程通信, 它所能够识别的窗体是上面我们看到的 W 这个 Binder 实体对象
接下来我们先看看, WMS 是如何通过 openSession 方法建立和应用进程的通信的
public class WindowManagerService extends IWindowManager.Stub {

    public IWindowSession openSession(IWindowSessionCallback callback, IInputMethodClient client,
            IInputContext inputContext) {
        ......
        // 可以看到在系统服务进程, 创建了一个 Session 对象返回给客户端
        Session session = new Session(this, callback, client, inputContext);
        return session;
    }

}

class Session extends IWindowSession.Stub implements IBinder.DeathRecipient {

    final WindowManagerService mService;
    final IWindowSessionCallback mCallback;
    final IInputMethodClient mClient;

    public Session(WindowManagerService service, IWindowSessionCallback callback,
            IInputMethodClient client, IInputContext inputContext) {
        mService = service;
        mCallback = callback;
        mClient = client;
    }

}
可以看到在系统服务进程, WMS 创建了一个 Session 的 Binder 实体对象, 然后就返回给了客户端, 我们拿到这个 Session 对象之后就可以将我们的窗体发送给 WMS 进行统一管理了
在 ViewRootImpl 的构造方法中我们可以看到, 成员变量 mWindow 是在其构造方法里 new 出来的, 下面看看它的创建
2. W 的创建
public final class ViewRootImpl implements ViewParent,
        View.AttachInfo.Callbacks, ThreadedRenderer.DrawCallbacks {

    static class W extends IWindow.Stub {

        private final WeakReference<ViewRootImpl> mViewAncestor;
        private final IWindowSession mWindowSession;

        W(ViewRootImpl viewAncestor) {
            // 保存了 ViewRootImpl 的弱引用
            mViewAncestor = new WeakReference<ViewRootImpl>(viewAncestor);
            // 保存了当前进程与 WMS 通信的会话
            mWindowSession = viewAncestor.mWindowSession;
        }

    }

}
可以看到它是一个 Binder 实体对象, 它的构造器中保存了这个 ViewRootImpl 的弱引用和 Session 的代理对象, 既然 W 是 Binder 对象, 因此这里我们可以猜测一下, 它可能会在后续通过跨进程通信添加到 WMS 中进行集中管理
不知道大家有没有发现, 在 ViewRootImpl 中我们几乎看不到的 Window 和 WindowManager 了, 那是因为他们是上层高度抽象出来的壳, 将 DecorView 和相关参数导入 ViewRootImpl 之后, 它们的任务就完成了
3. 回顾
ViewRootImpl 的创建流程如下
- 获取进程间单例的 IWindowSession 用于和 WMS 交互
- 创建一个 IWindow 的 Binder 实体对象 W, 描述当前 View 所在窗体
- 获取 Choreographer 示例对象, 用于调度 UI 渲染
接下来我们看看 ViewRootImpl.setView 与 DecorView 绑定时, 做了哪些操作
二) ViewRootImpl 初始化
public final class ViewRootImpl implements ViewParent,
View.AttachInfo.Callbacks, ThreadedRenderer.DrawCallbacks {
public void setView(View view, WindowManager.LayoutParams attrs, View panelParentView) {
synchronized (this) {
if (mView == null) {
mView = view;
......
if (panelParentView != null) {
// 若存在父窗体, 则保存父窗体的 token
mAttachInfo.mPanelParentWindowToken
= panelParentView.getApplicationWindowToken();
}
// 执行 View 绘制的三大流程
requestLayout();
......
try {
......
// 将窗体信息添加到 WMS 中
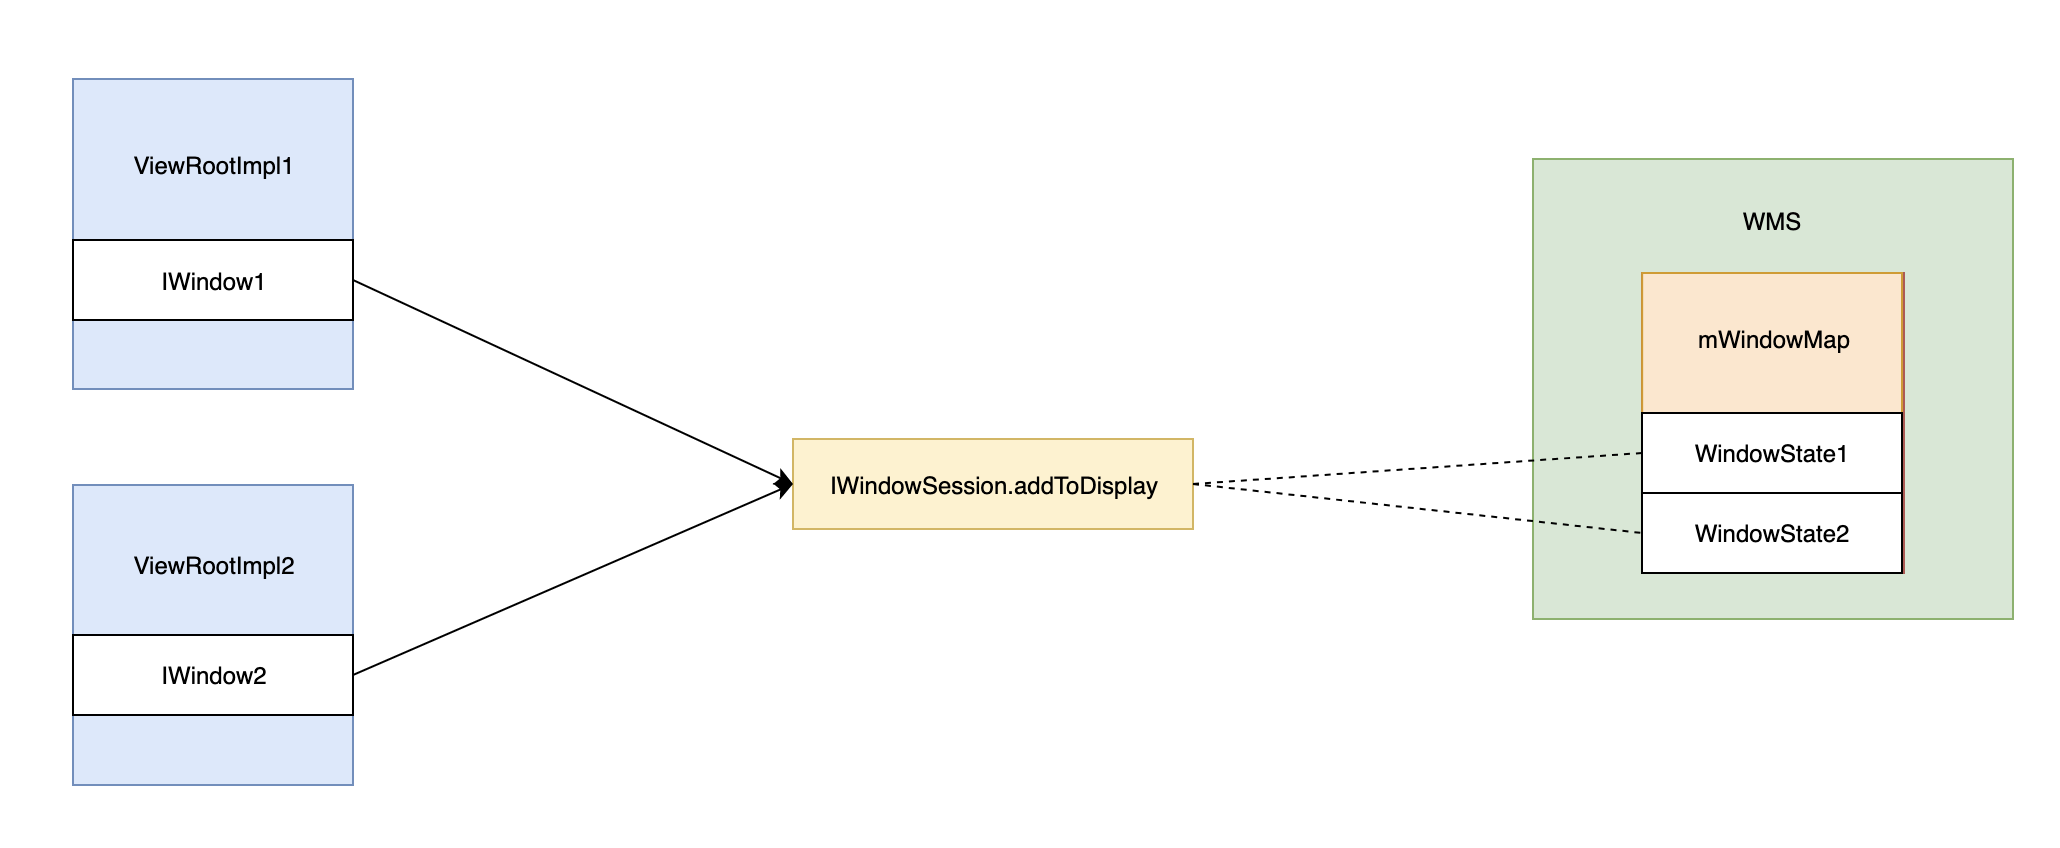
res = mWindowSession.addToDisplay(mWindow, mSeq, mWindowAttributes,
getHostVisibility(), mDisplay.getDisplayId(), mWinFrame,
mAttachInfo.mContentInsets, mAttachInfo.mStableInsets,
mAttachInfo.mOutsets, mAttachInfo.mDisplayCutout, mInputChannel);
} catch (RemoteException e) {
......
} finally {
......
}
}
}
}
}
现在回过头来看看 ViewRootImpl 主要有两个步骤
- 通过 requestLayout 执行 View 的遍历操作
- 通过 addToDisplay 通知 WMS 应用进程有一个新的窗体创建了
requestLayout 它会将 View 遍历的操作投放到消息队列中, 也就是说我们的 addToDisplay 会先于 View 的遍历操作执行
关于 requestLayout 我们到后面再单独分析, 这里先看看 addToDisplay 的操作
1. 将窗体添加到 WMS
从上面的分析可知, ViewRootImpl 中, 调用了 IWindowSession.addToDisplay 将窗体信息添加到了 WMS 中, 我们看看它是如何实现的
class Session extends IWindowSession.Stub implements IBinder.DeathRecipient {

    final WindowManagerService mService;

    @Override
    public int addToDisplay(IWindow window, int seq, WindowManager.LayoutParams attrs,
            int viewVisibility, int displayId, Rect outFrame, Rect outContentInsets,
            Rect outStableInsets, Rect outOutsets,
            DisplayCutout.ParcelableWrapper outDisplayCutout, InputChannel outInputChannel) {
        // 简单的进行了转发
        return mService.addWindow(this, window, seq, attrs, viewVisibility, displayId, outFrame,
                outContentInsets, outStableInsets, outOutsets, outDisplayCutout, outInputChannel);
    }

}

public class WindowManagerService extends IWindowManager.Stub {

    // 在 WMS 的构造函数中赋值, 其实例为 PhoneWindowManager
    final WindowManagerPolicy mPolicy;
    final WindowHashMap mWindowMap = new WindowHashMap();

    public int addWindow(Session session, IWindow client, int seq,
            LayoutParams attrs, int viewVisibility, int displayId, Rect outFrame,
            Rect outContentInsets, Rect outStableInsets, Rect outOutsets,
            DisplayCutout.ParcelableWrapper outDisplayCutout, InputChannel outInputChannel) {

        .......
        synchronized(mWindowMap) {
            // 1. 创建一个 DisplayContent, 它用来管理同一个 displayId 下的所有窗体
            final DisplayContent displayContent = getDisplayContentOrCreate(displayId);
            ......
            // 2. 创建一个窗体的描述
            final WindowState win = new WindowState(this, session, client, token, parentWindow,
                    appOp[0], seq, attrs, viewVisibility, session.mUid,
                    session.mCanAddInternalSystemWindow);
            ......
            // 3. 准备添加窗体
            res = mPolicy.prepareAddWindowLw(win, attrs);
            if (res != WindowManagerGlobal.ADD_OKAY) {
                return res;
            }
            // 4. 给这个窗体描述打开一个输入通道, 用于接收屏幕的点击事件(事件分发)
            final boolean openInputChannels = (outInputChannel != null
                    && (attrs.inputFeatures & INPUT_FEATURE_NO_INPUT_CHANNEL) == 0);
            if  (openInputChannels) {
                win.openInputChannel(outInputChannel);
            }
            if (res != WindowManagerGlobal.ADD_OKAY) {
                return res;
            }
            .......
            // 5. 会创建一个 SurfaceSession 与 SurfaceFlinger 交互
            win.attach();

            // 6. 以客户端的 W 的 Binder 代理对象为 key, 将 win 存入
            mWindowMap.put(client.asBinder(), win);
            .......

            // 7. 确认窗体中可用于布局区域的大小
            if (mPolicy.getLayoutHintLw(win.mAttrs, taskBounds, displayFrames, outFrame,
                    outContentInsets, outStableInsets, outOutsets, outDisplayCutout)) {
                res |= WindowManagerGlobal.ADD_FLAG_ALWAYS_CONSUME_NAV_BAR;
            }
        }
        ......
        return res;
    }
}
好的, 上面的省略的大量的代码, 保留了此次我们关注的点主要有以下几点
- 创建一个窗体的描述对象 WindowState, 与应用进程的 IWindow 对应
- 调用 WindowState.openInputChannel 创建一对 InputChannel
- 将接收端的 Socket 端口返回给应用进程, 用于接收屏幕的点击事件流
- 调用 WindowState.attach 方法
- 将窗体添加到 mWindowMap 中缓存
当构建的 WindowState 添加到了 WMS.mWindowMap 中缓存起来之后, 至此应用进程的窗体 IWindow 就与 WMS 联系在一起了, 他们交互的流程图如下所示
好的, 上面的方法中, 有一个非常重要的方法, 叫做 WindowState.attach, 它创建了这个窗体与 SurfaceFliger 交互的桥梁, 这里我们单独分析一下
WindowState.attach
class WindowState extends WindowContainer<WindowState> implements WindowManagerPolicy.WindowState {

    final Session mSession;

    void attach() {
        // 调用了 Session.windowAddedLocked 方法
        mSession.windowAddedLocked(mAttrs.packageName);
    }

}

class Session extends IWindowSession.Stub implements IBinder.DeathRecipient {

    SurfaceSession mSurfaceSession;
    private int mNumWindow = 0;

    void windowAddedLocked(String packageName) {
        mPackageName = packageName;
        if (mSurfaceSession == null) {
            // 这里创建了一个 SurfaceSession 对象
            mSurfaceSession = new SurfaceSession();
            // 添加到 WMS 的缓存中
            mService.mSessions.add(this);
            ......
        }
        // 表示这个 Session 对象所管理的进程中, 又多了一个 Window
        mNumWindow++;
    }

}
好的, 可以看到 WindowState.attach 方法, 会在这个窗体应用进程对应的 Session 中, 创建一个 mSurfaceSession 对象, 然后把它添加到 WMS 的缓存中, 这个 SurfaceSession 承担着与 Session 一样的作用
- Session 是 IWindowSession 的 Binder 实体对象, 它用与管理一个应用进程与 WMS 进程的交互
- SurfaceSession 也是如此, 它用来管理一个应用进程与 SurfaceFlinger 的交互
- SurfaceFlinger 是专门用来渲染 UI 的进程
接下来我们就看看这个 SurfaceSession 对象是如何构建的
public final class SurfaceSession {
    // 描述 SurfaceComposerClient 的句柄
    private long mNativeClient;

    public SurfaceSession() {
        // 调用了 nativeCreate 获取了一个句柄值
        mNativeClient = nativeCreate();
    }

    private static native long nativeCreate();
}
好的, 可以看到 SurfaceSession 的构造方式非常简单, 它调用 nativeCreate 获取了一个句柄值, 接下来我们看看它在 Native 层的操作
// frameworks/base/core/jni/android_view_SurfaceSession.cpp
static jlong nativeCreate(JNIEnv* env, jclass clazz) {
    // 可以看到创建了一个 SurfaceComposerClient 的 C++ 对象
    SurfaceComposerClient* client = new SurfaceComposerClient();
    client->incStrong((void*)nativeCreate);// 增加一个强引用
    // 返回给 Java 层一个句柄值
    return reinterpret_cast<jlong>(client);
}
很简单, 创建了一个 SurfaceComposerClient C++ 对象, 描述与 SurfaceFlinger 通信的客户端
2. 回顾
ViewRootImpl 的初始化操作主要如下
- 通过 requestLayout 将 View 的遍历的操作投放到消息队列
- 通过 addToDisplay 通知 WMS 有一个新的窗体创建了
- 创建 WindowState
- 创建 InputChannel
- 调用 WindowState.attach, 创建一个 Session 描述当前 Window 与 SurfaceFlinger 的通信
- 添加到 mWindowMap 中缓存
四. 总结
初始化 Window
Activity 初始化 Window 的时机在 Activity.attach 方法中
- 创建 PhoneWindow 实例保存在 Activity 中
- 为 Window 绑定 WindoManager
- 获取 Context 缓存的 WindowManager
- 通过 Context 缓存的 WindowManager 创建为当前 PhoneWindow 创建对应的 WindowManagerImpl
- 每一个 Window 都有自己对应的 WindowManager 对象
为 Window 填充 View
为 Window 填充 View 的时机在 setContentView 中
- 给 Window 安装 DecorView
- 创建 DecorView
- 为 DecorView 填充布局 mContentRoot
- 将 mContentRoot 中 R.id.content 的 View 保存到 mContentParent
- 将我们传入的布局填充到 mContentParent
与 WMS 建立联系
与 WMS 建立联系的时机在 onResume 之后
- WindowManager.addView, 将 Window 中的 DecorView 缓存到 WindowManagerGlobal
- 创建 DecorView 的管理实现类 ViewRootImpl
- 获取 IWindowSession 用于和 WMS 交互
- 创建一个 IWindow 的 Binder 实体对象 W, 描述当前 View 所在窗体
- 获取 Choreographer 示例对象, 用于调度 UI 渲染
- 调用 ViewRootImpl.setView 将 DecorView 注入
- 通过 requestLayout 将 View 的遍历的操作投放到消息队列
- 通过 addToDisplay 通知 WMS 有一个新的窗体创建了
- 创建 WindowState
- 创建 InputChannel
- 调用 WindowState.attach, 创建一个 Session 描述当前 Window 与 SurfaceFlinger 的通信
- 添加到 mWindowMap 中缓存
到这里我们的图形渲染的准备工作就完成了 就初始化完成了, 不过此时 View 依然还没有呈现到屏幕上, 需要将 requestLayout 执行完毕, 我们才能看到目标的界面, 后面的流程还非常漫长