前言
上面一篇文章我们了解了 Service 的启动流程, 这里我们分析一下 Service 的绑定流程
// 发起端
class ClientActivity extends AppCompatActivity {

     // 创建一个 Connection 对象, 用于和服务建立连接
     private val connect: ServiceConnection = object : ServiceConnection {

        override fun onServiceDisconnected(name: ComponentName?) {

        }

        override fun onServiceConnected(name: ComponentName?, service: IBinder?) {
            // TODO: 获取服务端提供的 Binder 代理对象
        }
    }

    override fun onCreate(savedInstanceState: Bundle?) {
        super.onCreate(savedInstanceState)
        setContentView(R.layout.activity_main)
        bindService(Intent(this, TargetService::class.java), connect, BIND_AUTO_CREATE)
    }

}

// 目标服务, 与发起者在同一个进程
public class TargetService extends Service {

    TargetBinder mBinder;

    @Override
    public IBinder onBind(Intent intent) {
        mBinder = new TargetBinder();
        return mBinder;
    }

    ......
}
服务的绑定操作是通过 bindService 方法发起的, 之前的 Activity 的启动和服务的启动, 都是探讨在不同进程的情况, 对新进程的创建已经非常熟悉了, 这里看看与发起端在同一个进程的处理过程
一. 绑定操作的发起
在 Activity 中的 bindService, 最终会调用到 ContextImpl 中的 bindService, 我们看看它的实现
class ContextImpl {
    ......

    @Override
    public boolean bindService(Intent service, ServiceConnection conn,
            int flags) {
        warnIfCallingFromSystemProcess();
        return bindServiceCommon(service, conn, flags, mMainThread.getHandler(), getUser());
    }

    private boolean bindServiceCommon(Intent service, ServiceConnection conn, int flags, Handler
            handler, UserHandle user) {
        // Keep this in sync with DevicePolicyManager.bindDeviceAdminServiceAsUser.
        IServiceConnection sd;
        ......
        if (mPackageInfo != null) {
            // 1. 将 conn 封装成了一个实现了 IServiceConnection 的 Binder 本地对象
            sd = mPackageInfo.getServiceDispatcher(conn, getOuterContext(), handler, flags);
        } else {
            ......
        }
        ......
        try {
            .......
            // 2. 将相关参数传递给 AMS, 进行服务的绑定操作
            int res = ActivityManager.getService().bindService(
                mMainThread.getApplicationThread(),
                getActivityToken(),
                service,
                service.resolveTypeIfNeeded(getContentResolver()),
                sd,
                flags,
                getOpPackageName(),
                user.getIdentifier()
            );
        } catch (RemoteException e) {
            ......
        }
    }

}

class LoadedApk {

    private final ArrayMap<Context, ArrayMap<ServiceConnection, LoadedApk.ServiceDispatcher>> mServices
        = new ArrayMap<>();

    public final IServiceConnection getServiceDispatcher(ServiceConnection c,
            Context context, Handler handler, int flags) {
        synchronized (mServices) {
            LoadedApk.ServiceDispatcher sd = null;
            // 通过 Context 获取其内部的 sc 和 sd 的映射 map
            // 通过传参可知, 这个 context 通过是 getOuterContext() 获取的, 即我们的 ClientActivity
            ArrayMap<ServiceConnection, LoadedApk.ServiceDispatcher> map = mServices.get(context);
            if (map != null) {
                // 通过缓存获取 ServiceDispatcher 对象
                sd = map.get(c);
            }
            if (sd == null) {
                // 创建一个 ServiceDispatcher 对象
                sd = new ServiceDispatcher(c, context, handler, flags);
                if (map == null) {
                    // 创建缓存散列表
                    map = new ArrayMap<>();
                    // 添加到 mServices 中维护
                    mServices.put(context, map);
                }
                // 将 sc 和 sd 的映射添加到 map 中去
                map.put(c, sd);
            } else {
                ......
            }
            // 返回 sd 中 IServiceConnection 对象
            return sd.getIServiceConnection();
        }
    }

    static final class ServiceDispatcher {

        // IServiceConnection 的 Binder 本地对象
        private final ServiceDispatcher.InnerConnection mIServiceConnection;
        // 本地绑定服务创建的连接
        private final ServiceConnection mConnection;
        // 本次绑定服务发起者, 即我们的 ClientActivity
        private final Context mContext;
        // 当前进程, 主线程的 handler
        private final Handler mActivityThread;
        ......

        // 一个 IServiceConnection 的 Binder 本地对象实现类
        private static class InnerConnection extends IServiceConnection.Stub {
            // 持有其外部类 ServiceDispatcher 对象的弱引用
            final WeakReference<LoadedApk.ServiceDispatcher> mDispatcher;

            InnerConnection(LoadedApk.ServiceDispatcher sd) {
                mDispatcher = new WeakReference<LoadedApk.ServiceDispatcher>(sd);
            }

            .......
        }

        ServiceDispatcher(ServiceConnection conn,
                Context context, Handler activityThread, int flags) {
            mIServiceConnection = new InnerConnection(this);
            mConnection = conn;
            mContext = context;
            mActivityThread = activityThread;
            .......
        }
        ......
     }
}
可以发现在发起端主要, bindService 主要做了如下几件事情
- 将 ServiceConnection 和其他相关参数封装成了一个 IServiceConnection 的 Binder 本地对象
- 这个 binder 本地对象的实现类为 ServiceDispatcher.InnerConnection
- 内部持有一个 ServiceDispatcher 的弱引用和 connect 方法
- 这个 binder 本地对象的实现类为 ServiceDispatcher.InnerConnection
- 将相关参数传递给 AMS, 真正的执行服务的绑定
接下来, 就看看 AMS 中 bindService 做了哪些操作
二. AMS 处理服务的绑定
class ActivityManagerService {

    public int bindService(IApplicationThread caller, IBinder token, Intent service,
            String resolvedType, IServiceConnection connection, int flags, String callingPackage,
            int userId) throws TransactionTooLargeException {
        // ......
        synchronized(this) {
            // 将绑定服务的操作, 扔给了 ActiveServices
            return mServices.bindServiceLocked(caller, token, service,
                    resolvedType, connection, flags, callingPackage, userId);
        }
    }
}

public final class ActiveServices {

    int bindServiceLocked(IApplicationThread caller, IBinder token, Intent service,
            String resolvedType, final IServiceConnection connection, int flags,
            String callingPackage, final int userId) throws TransactionTooLargeException {
        // 1. 获取请求者的进程描述
        final ProcessRecord callerApp = mAm.getRecordForAppLocked(caller);
        // 2. 获取要与这个服务绑定的 Activity 的描述
        ActivityRecord activity = null;
        if (token != null) {
            // 我们知道这个 token 是在请求进程中, 通过 getActivityToken() 获取的, 即一个 ClientActivity 的描述
            activity = ActivityRecord.isInStackLocked(token);
            ......
        }
        // 判断是否是系统进程发起的绑定操作
        final boolean isCallerSystem = callerApp.info.uid == Process.SYSTEM_UID;
        if (isCallerSystem) {
           .......
        }
        // 3. 通过 retrieveServiceLocked 获取一个封装了请求服务描述 ServiceRecord 的查找结果对象
        ServiceLookupResult res =
            retrieveServiceLocked(service, resolvedType, callingPackage, Binder.getCallingPid(),
                    Binder.getCallingUid(), userId, true, callerFg, isBindExternal, allowInstant);
        ......
        // 3.1 通过查找结果对象, 获取这个即将绑定服务的描述, 即我们的 TargetService 的描述
        ServiceRecord s = res.record;
        ......
        try {
            // 4. 从 ServiceRecord 中获取 AppBindRecord 对象, 这个对象是与该服务绑定的应用的描述
            // service 为我们请求的 Intent, callerApp 即我们发起绑定请求, ClientActivity 所在进程的描述
            AppBindRecord b = s.retrieveAppBindingLocked(service, callerApp);
            // 5. 创建一个请求的 Activity 与 Service 之间连接的描述
            ConnectionRecord c = new ConnectionRecord(b, activity,
                    connection, flags, clientLabel, clientIntent);
             // 6. 将这个连接的描述添加到目标 Service 的描述中缓存
            IBinder binder = connection.asBinder();
            ArrayList<ConnectionRecord> clist = s.connections.get(binder);
            if (clist == null) {
                clist = new ArrayList<ConnectionRecord>();
                s.connections.put(binder, clist);
            }
            clist.add(c);
            // 7. 将这个连接的描述, 添加到 AppBindRecord 的 connections 中缓存
            b.connections.add(c);
            // 8. 将这个与服务连接的描述, 添加到请求 Activity 的描述中缓存
            if (activity != null) {
                if (activity.connections == null) {
                    activity.connections = new HashSet<ConnectionRecord>();
                }
                activity.connections.add(c);
            }
            // 9. 将这个连接的描述, 添加到 AppBindRecord client connections 中缓存
            b.client.connections.add(c);
            ......
            // 10. 将这个连接的描述, 添加到成员变量 mServiceConnections 中缓存
            clist = mServiceConnections.get(binder);
            if (clist == null) {
                clist = new ArrayList<ConnectionRecord>();
                mServiceConnections.put(binder, clist);
            }
            clist.add(c);
            // 11. 调用  bringUpServiceLocked 执行后续操作
            if ((flags&Context.BIND_AUTO_CREATE) != 0) {
                s.lastActivity = SystemClock.uptimeMillis();
                if (bringUpServiceLocked(s, service.getFlags(), callerFg, false,
                        permissionsReviewRequired) != null) {
                    return 0;
                }
            }
            ......
        catch() {
            ......
        }
    }

}
好的, 可以看到 ActivityManagerService 在接收到 bindService 请求后, 会进行如下的操作
- 获取请求进程的描述: ProcessRecord callerApp
- 获取请求 Activity 的描述: ActivityRecord activity
- 获取目标 Service 的描述: ServiceRecord s
- 创建一个与该服务绑定的应用描述: AppBindRecord b
- 创建一个 Activity 与 Service 连接的描述: ConnectionRecord c
- 将这个 连接的描述 添加到 目标 Service 的描述中缓存
- 将这个 连接的描述 添加到 AppBindRecord.connections 中缓存
- 将这个 连接的描述 添加到 Activity 的描述中缓存
- 将这个 连接的描述 添加到 AppBindRecord.client.connections 中缓存
- 将这个 连接的描述 添加到 成员变量 mServiceConnections 中缓存
- 调用 bringUpServiceLocked 执行后续操作
好了可以看到, bindService 被调用之后, ActiveServices 会建立一个非常庞大的缓存网络, 我们接下来就梳理一下, 这个缓存网络是如何建立起来的
首先看看如何通过 ServiceRecord.retrieveAppBindingLocked 实例化 AppBindRecord 这个类的对象的
一) AMS 服务绑定的缓存设计
class ServiceRecord {

    ......

    // 维护了一个使用 Intent 和 Intent 对应描述的映射集合
    final ArrayMap<Intent.FilterComparison, IntentBindRecord> bindings
            = new ArrayMap<Intent.FilterComparison, IntentBindRecord>();

    // 维护了一个 IServiceConnection 和使用它与当前服务建立连接的 Activity 的描述
    final ArrayMap<IBinder, ArrayList<ConnectionRecord>> connections
            = new ArrayMap<IBinder, ArrayList<ConnectionRecord>>();

    // 获取 AppBindRecord 对象
    public AppBindRecord retrieveAppBindingLocked(Intent intent,
            ProcessRecord app) {
        // 1. 创建了一个 Intent 的包装类对象 filter
        // 它通过比较 intent 中的各项过滤属性判断两个 intent 是否可以视为相同的
        Intent.FilterComparison filter = new Intent.FilterComparison(intent);
        // 2. 从成员变量 bindings 中获取这个 filter 映射的 IntentBindRecord 对象
        // IntentBindRecord 描述的是一个专门用于服务绑定的 Intent
        IntentBindRecord i = bindings.get(filter);
        if (i == null) {
            i = new IntentBindRecord(this, filter);
            bindings.put(filter, i);
        }
        // 3. 从与服务绑定的 Intent 描述中获取使用这个 Intent 与当前服务绑定的进程对应的应用描述
        AppBindRecord a = i.apps.get(app);
        if (a != null) {
            return a;
        }
        a = new AppBindRecord(this, i, app);
        i.apps.put(app, a);
        // 返回与当前服务绑定的应用描述
        return a;
    }

    ......
}

class Intent {

    // 这是一个 Intent 的包装类
    public static final class FilterComparison {
        private final Intent mIntent;
        private final int mHashCode;

        public FilterComparison(Intent intent) {
            mIntent = intent;
            mHashCode = intent.filterHashCode();
        }

        // 通过比较 filter 来判断两个 Intent 是否相同
        @Override
        public boolean equals(Object obj) {
            if (obj instanceof FilterComparison) {
                Intent other = ((FilterComparison)obj).mIntent;
                return mIntent.filterEquals(other);
            }
            return false;
        }

    }

    public boolean filterEquals(Intent other) {
        if (other == null) {
            return false;
        }
        if (!Objects.equals(this.mAction, other.mAction)) return false;
        if (!Objects.equals(this.mData, other.mData)) return false;
        if (!Objects.equals(this.mType, other.mType)) return false;
        if (!Objects.equals(this.mPackage, other.mPackage)) return false;
        if (!Objects.equals(this.mComponent, other.mComponent)) return false;
        if (!Objects.equals(this.mCategories, other.mCategories)) return false;

        return true;
    }
}

/**
 * 描述一个将要与服务绑定的 Intent
 */
final class IntentBindRecord {
    // 要绑定的服务描述
    final ServiceRecord service;
    // Intent 实体对象
    final Intent.FilterComparison intent;
    // 所有使用这个 IntentBindRecord 与 service 绑定的应用的描述
    final ArrayMap<ProcessRecord, AppBindRecord> apps = new ArrayMap<ProcessRecord, AppBindRecord>();
}

/**
 * 描述一个与当前 Service 绑定的客户端应用
 */
final class AppBindRecord {
    // 绑定的目标服务
    final ServiceRecord service;
    // 与服务绑定的 Intent 描述
    final IntentBindRecord intent;
    // 当前应用进程的描述
    final ProcessRecord client;
    // 客户端进程与这个服务建立连接的集合
    // 一个进程中, 可以有多个 Activity 与一个服务绑定
    final ArraySet<ConnectionRecord> connections = new ArraySet<>();
}
可见这里的缓存设计非常的复杂, 这里总结一下
- ServiceRecord: 它是一个服务的描述类
- ArrayMap<Intent.FilterComparison, IntentBindRecord> bindings
- 维护了一个使用 Intent 和 Intent 对应描述的映射集合
- ArrayMap<IBinder, ArrayList
> connections - 维护了一个 IServiceConnection 和使用它与当前服务建立连接的 Activity 的描述
- ArrayMap<Intent.FilterComparison, IntentBindRecord> bindings
- Intent.FilterComparison: 是一个 Intent 的封装类, 它通过 filter 来比较两个 Intent 对象是否相等
- IntentBindRecord: 它用来描述一个专门用于服务绑定的 Intent
- ArrayMap<ProcessRecord, AppBindRecord> apps: 不同的应用, 可以使用同一个 Intent 来绑定服务
- AppBindRecord: 它用来描述一个与指定 Service 绑定的应用
- ArraySet
connections: 一个 Service 可以与一个应用中的多个 Activity 进行绑定
- ArraySet
它们之间的关系如下图所示:

二) 启动服务
好的, 分析完了 Service 绑定的缓存设计之后, 我们便可以更好的往下进行了, 在 ActiveServices.bindServiceLocked 中, 经过了一系列的缓存之后, 最终会调用 bringUpServiceLocked 方法, 我们继续往下分析
class ActiveServices {

    .......
    private String bringUpServiceLocked(ServiceRecord r, int intentFlags, boolean execInFg,
            boolean whileRestarting, boolean permissionsReviewRequired)
            throws TransactionTooLargeException {
         .......
        final boolean isolated = (r.serviceInfo.flags&ServiceInfo.FLAG_ISOLATED_PROCESS) != 0;
        final String procName = r.processName;
        ProcessRecord app;
        // 该服务于请求的 Activity 在同一个进程里, 故会走到这个分支中
        if (!isolated) {
            // 获取进程描述
            app = mAm.getProcessRecordLocked(procName, r.appInfo.uid, false);
            if (app != null && app.thread != null) {
                try {
                    app.addPackage(r.appInfo.packageName, r.appInfo.longVersionCode, mAm.mProcessStats);
                    // 1. 调用了 realStartServiceLocked, 执行服务的启动
                    realStartServiceLocked(r, app, execInFg);
                    return null;
                } catch (TransactionTooLargeException e) {
                    ......
                } catch (RemoteException e) {
                    ......
                }
            }
        }
    }
    ......
    private final void realStartServiceLocked(ServiceRecord r,
            ProcessRecord app, boolean execInFg) throws RemoteException {
        ......
        try {
            ......
            // 2. 调用对应进程的的主线程描述去执行服务的启动, 这里与服务的启动如出一辙, 就不再分析了
            app.thread.scheduleCreateService(r, r.serviceInfo,
                    mAm.compatibilityInfoForPackageLocked(r.serviceInfo.applicationInfo),
                    app.repProcState);
            ......
        } catch (DeadObjectException e) {
            ......
        } finally {
            ......
        }
        ......
        // 3. 调用了 requestServiceBindingsLocked 进行服务的绑定
        requestServiceBindingsLocked(r, execInFg);
    }
}
可以 ActiveServices.bringUpServiceLocked 被调用之后
- 首先会调用 realStartServiceLocked 来启动这个服务
- 服务的启动已经在 Service 的启动中详细分析过
- realStartServiceLocked 方法中当服务启动成功之后, 会调用 requestServiceBindingsLocked 来请求该服务的绑定操作
启动成功之后, 我们接着分析它的绑定
三) 处理服务的绑定
class ActiveServices {
     private final void requestServiceBindingsLocked(ServiceRecord r, boolean execInFg)
            throws TransactionTooLargeException {
        // 我们知道 r.bindings 是一个 Intent.FilterComparison 和 IntentBinderRecord 的映射表
        for (int i=r.bindings.size()-1; i>=0; i--) {
            // 获取所有用于绑定该服务的 Intent 描述
            IntentBindRecord ibr = r.bindings.valueAt(i);
            // 调用 requestServiceBindingLocked 重载方法
            if (!requestServiceBindingLocked(r, ibr, execInFg, false)) {
                break;
            }
        }
    }

    private final boolean requestServiceBindingLocked(ServiceRecord r, IntentBindRecord i,
            boolean execInFg, boolean rebind) throws TransactionTooLargeException {
        if ((!i.requested || rebind) && i.apps.size() > 0) {
            try {
                ......
                // 回到服务创建的进程中去安排绑定服务的操作
                r.app.thread.scheduleBindService(r, i.intent.getIntent(), rebind,
                        r.app.repProcState);
            } catch (TransactionTooLargeException e) {
               ......
            } catch (RemoteException e) {
                ......
            }
        }
        return true;
    }
}
好的可以看到 ActiveServices.requestServiceBindingsLocked 中
- 遍历了 ServiceRecord 内部存储的所有 IntentBindRecord 对象
- 然后调用了重载方法去执行服务的绑定
- 最终会调用服务创建进程的中应用线程描述中的 scheduleBindService 方法去执行下一步操作
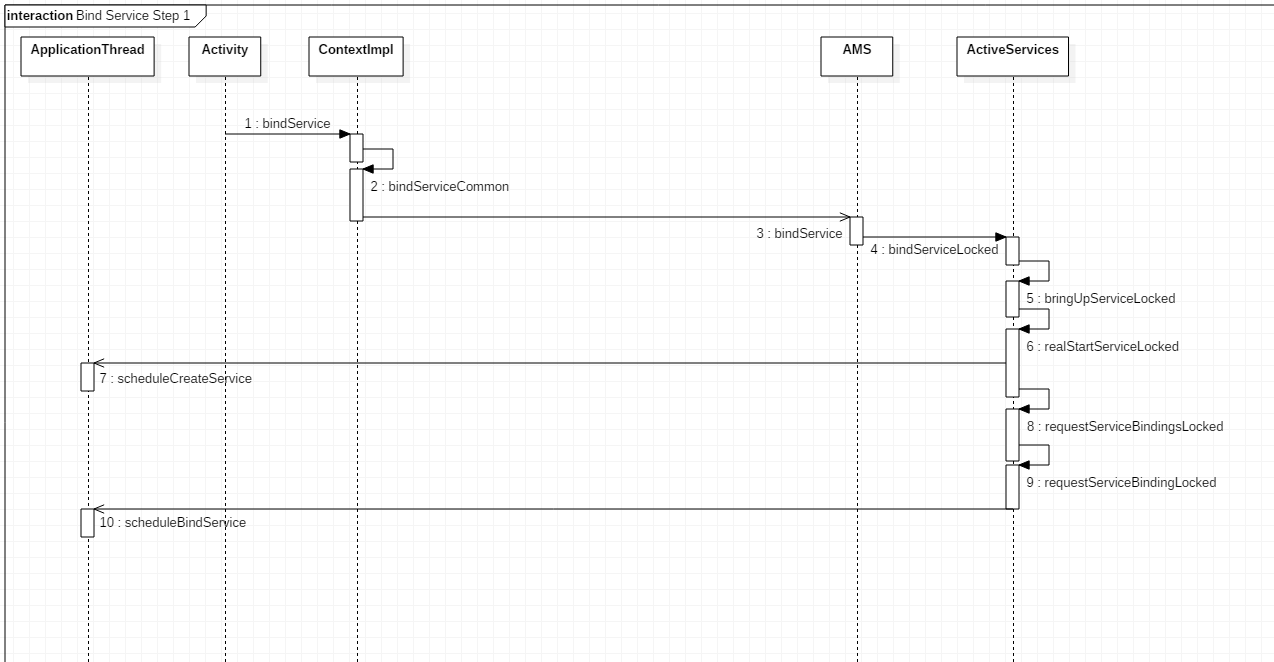
回顾
这里画一个 UML 图简单的总结一下这一阶段(跳过了 Service 启动的部分)
三. 回调 onBind 方法, 获取 Binder 代理对象
class ActivityThread {

    class ApplicationThread {
        public final void scheduleBindService(IBinder token, Intent intent,
                boolean rebind, int processState) {
            updateProcessState(processState, false);
            BindServiceData s = new BindServiceData();
            s.token = token;
            s.intent = intent;
            s.rebind = rebind;
            ......
            // 1. 发送信息, 交给主线程的 Handler 处理
            sendMessage(H.BIND_SERVICE, s);
        }
    }

    class H extends Handler {

         public void handleMessage(Message msg) {
            switch (msg.what) {
                  case BIND_SERVICE:
                    // 调用外部类的  handleBindService 的方法
                    handleBindService((BindServiceData)msg.obj);
                    break;
                ......
            }
        }
    }

    private void handleBindService(BindServiceData data) {
        // 通过 token 获取服务的实例对象, 在 scheduleCreateService 时, 这个对象就已经创建好了
        Service s = mServices.get(data.token);
        if (s != null) {
            try {
                ......
                try {
                    if (!data.rebind) {// 不是 rebind 则进入这个分支
                        // 调用 onBinder 方法, 获取一个 Binder 本地对象
                        IBinder binder = s.onBind(data.intent);
                        // 调用 AMS 的 publishService 方法, 将创建的 binder 本地对象, 通过与 Activity 建立的连接, 发布初期
                        ActivityManager.getService().publishService(
                                data.token, data.intent, binder);
                    } else {
                        // 若为 rebind, 进入这个分支
                        s.onRebind(data.intent);
                        ......
                    }
                    ......
                } catch (RemoteException ex) {
                    ......
                }
            } catch (Exception e) {
                .......
            }
        }
    }
}
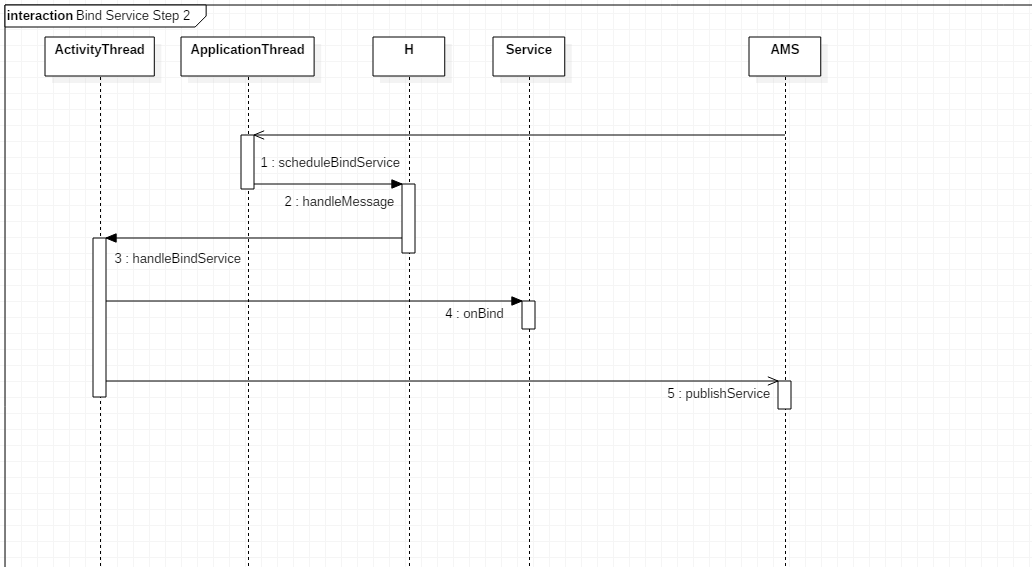
可以看到 scheduleBindService 最终主要做了如下的操作
- 调用服务的 onBinder 方法, 获取一个 Binder 本地对象
- 调用 AMS 的 publishService 方法, 通知 AMS 发布 bind 代理对象
这一阶段的 UML 图入下
四. AMS 发布 Binder 代理对象
class ActivityManagerService {

    public void publishService(IBinder token, Intent intent, IBinder service) {
        .......
        synchronized(this) {
            // 调用了 ActiveServices 的 publishServiceLocked
            mServices.publishServiceLocked((ServiceRecord)token, intent, service);
        }
    }

}

class ActiveServices {
    void publishServiceLocked(ServiceRecord r, Intent intent, IBinder service) {
        ......
        try {
            if (r != null) {
                // 1. 通过上面的源码分析可知, 这个 Intent 本质上还是我们 ClientActivity 传入的 Intent
                // 这里将它封装成了方便使用 Filter 比较的 FilterComparison 对象
                Intent.FilterComparison filter = new Intent.FilterComparison(intent);
                // 2. 通过上面的缓存分析我们知道, 一个 FilterComparison 是对应一个 IntentBindRecord 的
                // 我们在 bindService 发起的时候, 就已经将这个 IntentBindRecord 写入 ServiceRecord 中的缓存了, 显然不为 null
                IntentBindRecord b = r.bindings.get(filter);
                if (b != null && !b.received) {
                    // 给一些变量赋值
                    b.binder = service;
                    b.requested = true;
                    b.received = true;
                    // 3. 遍历 connections 映射哈希表<IServiceConnection, ArrayList<ConnectionRecord>>
                    for (int conni=r.connections.size()-1; conni>=0; conni--) {
                        // 3.1 获取索引为 conni 时 IServiceConnection 对应的连接描述集合
                        ArrayList<ConnectionRecord> clist = r.connections.valueAt(conni);
                        for (int i=0; i<clist.size(); i++) {
                            // 遍历连接的描述
                            ConnectionRecord c = clist.get(i);
                            // 3.2 判断这个与 Activity 连接的描述中保存的 intent , 是否等同于我们请求 intent
                            if (!filter.equals(c.binding.intent.intent)) {
                                ......
                                continue;
                            }
                            try {
                                // 3.3 若相等, 则调用 ConnectionRecord 中 IServiceConnection 对象的 connected 方法, 建立连接
                                c.conn.connected(r.name, service, false);
                            } catch (Exception e) {
                                ......
                            }
                        }
                    }
                }
                ......
            }
        } finally {
            .......
        }
    }
}
这部分的代码比较高能, 我们来梳理一下 ActiveServices.publishServiceLocked 主要的操作
- 首先将我们的 intent 封装成为 FilterComparison 对象, 用于通过 filter 来比较两个 intent 是否相同
- 从 ServiceRecord 的 bindings 哈希表中获取 intent 对应的 IntentBindRecord 对象
- 它用来描述一个用于绑定该服务的 Intent, 它是如何加入缓存的, 在 bindServiceLocked 中已经分析过了
- 遍历 ServiceRecord 的 connections 哈希表
- 获取指定索引处 IServiceConnection 映射的 ConnectionRecord 集合
- IServiceConnection: 这个对象是我们将 ClientActivity 中的 ServiceConnection 封装之后创建
- ConnectionRecord 集合: 一个 IServiceConnection 可能会用于多个 Activity 与该服务绑定, 这便是维护集合的意义
- 遍历 ConnectionRecord 集合
- 若遍历到的 ConnectionRecord 中的 intent 与 IntentBindRecord 中描述的 intent 相等, 则说明这个 ConnectionRecord 就是用来描述发起 Activity 和该服务之间的连接的
- 调用 ConnectionRecord 保存的 IServiceConnection 对象的代理方法 connected 进行我们 ClientActivity 与 Service 的连接操作
- 获取指定索引处 IServiceConnection 映射的 ConnectionRecord 集合
经过这样子的分析之后, 感觉一切都明了, 原来 Android framework 层考虑的这么多东西, 难怪要设计这么复杂的缓存, 这就是为什么在 bindServiceLocked 时要单独梳理缓存的原因
接下来看看 IServiceConnection.connected 做了什么操作
IServiceConnection.connected
这个连接操作, 其实在上面已经贴过了, 这里再回顾一下
class LoadedApk {

    static final class ServiceDispatcher {

        // 一个 IServiceConnection 的 Binder 本地对象实现类
        private static class InnerConnection extends IServiceConnection.Stub {

            // 持有其外部类 ServiceDispatcher 对象的弱引用
            final WeakReference<LoadedApk.ServiceDispatcher> mDispatcher;

            InnerConnection(LoadedApk.ServiceDispatcher sd) {
                mDispatcher = new WeakReference<LoadedApk.ServiceDispatcher>(sd);
            }

            // 执行连接操作
            public void connected(ComponentName name, IBinder service, boolean dead)
                    throws RemoteException {
                LoadedApk.ServiceDispatcher sd = mDispatcher.get();
                if (sd != null) {
                    // 调用了外部类的 connected 方法
                    sd.connected(name, service, dead);
                }
            }
        }

        // 保存了 ServiceConnection 的实例对象
        private final ServiceConnection mConnection;

        public void connected(ComponentName name, IBinder service, boolean dead) {
            if (mActivityThread != null) {
                mActivityThread.post(new RunConnection(name, service, 0, dead));
            } else {
                // 调用了自身的 doConnected
                doConnected(name, service, dead);
            }
        }

         public void doConnected(ComponentName name, IBinder service, boolean dead) {
            ......
            // 回调了onServiceConnected
            // 至此我们的的 ClientActivity 中定义的 ServiceConnection 方法就可以收到服务端传递过来的 Binder 对象了
            if (service != null) {
                mConnection.onServiceConnected(name, service);
            } else {
                ......
            }
        }
     }
}
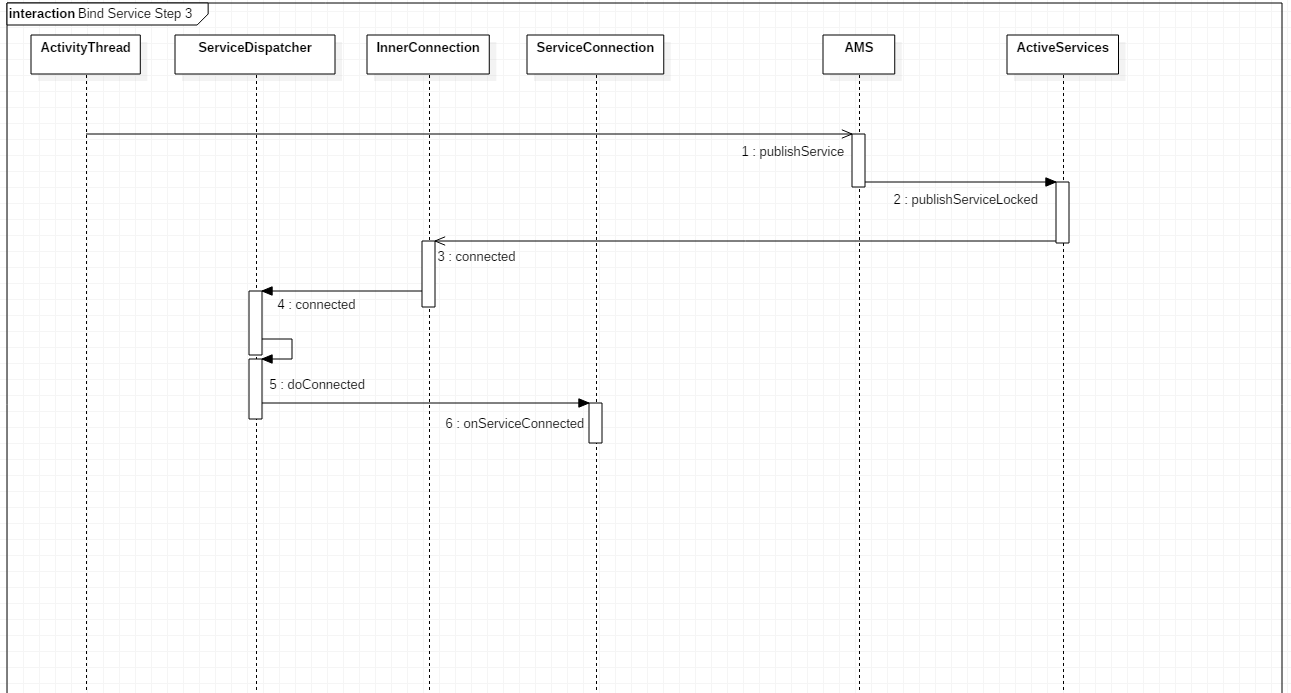
可以看到最终我们在 ClientActivity 中的 onServiceConnected 会被成功回调, 至此一次服务的绑定就完成了, 画个 UML 图总结一下这一阶段的流程
总结
服务的绑定与比起服务的启动, 要复杂的多, 不仅要考虑缓存, 还增加了 onBind 的回调与发布, 它具体分为如下几步操作
- AMS 启动服务(若目标进程未启动, 则先启动目标进程)
- 启动成功之后, 通知 AMS 进行后续的绑定
- AMS 调用服务的 onBind 方法, 获取一个 Binder 代理对象
- AMS 将 Binder 代理对象发送给请求方